2025-11-07

Food Processor Focaccia #1: overflows machine

I no longer I have a big KitchenAid stand mixer, so I wanted to try making the dough in my Bosch Multitalent 8 food processor. In the US, I made Focaccia bread in US "half sheet" pans, but our oven in Barcelona is much smaller. Even the built-in tray is smaller, so I scaled my recipe by 77% to fit the reduced size:

Half-Sheet: 33x18 inch = 45x33 cm = 1485 cm^2 area
Oven tray: 38x30 cm = 1140 cm^2 area -- 77% of a half sheet pan

690 g   Flour
514 g   Water
  9 g   Yeast
 12 g   Salt
115 ml  Olive Oil, extra virgin
 12 g   Rosemary, fresh, chopped fine, for topping
  7 g   Salt, coarse, for topping

Add the Water and Flour to the processor and whiz on slowest speed to combine.
Let rest 30 minutes to autolize (allow enzymes to convert starch to sugar, develop gluten, and slacken dough).
Add Yeast and whiz at lowest speed for 1 minute.
Add Salt and whiz at lowest speed for 2 minutes; the motor started smelling hot, and after a minute it shutdown due to thermal overload. Worse, the dough had escaped down the drive tube into the drive shaft. I scooped out all the dough into a bowl, covered, and let rise 45 minutes until about doubled. 
Cover oven tray with foil and pour in all the oil.
Spread the dough as much as you can, but it will spring back.
Refrigerate 10 minutes and spread again, ensuring you get oil under all the dough.
Repeat twice.
Top with chopped Rosemary and coarse Salt, dimple, and let rise an hour.
Bake 45 minutes at 180C.

Before and after:

Despite the trauma with the dough and the food processor, it turned out OK: a little more chewy than I'd like, perhaps a bit under risen and bubbly. 

Next time:

I'd like to make this again, avoiding problems and with some improvements. 

The Manual for the MC812M844 on Page 9 shows a maximum of 750 g Flour and 2 minutes low speed for the dough hook; I was under both of those. 


Try adding the Flour first, then while spinning (on slowest setting) drizzle in the Water, and stop when combined. I probably do not need the 1 and 2 minute whiz after adding Yeast and Salt, especially since it's a high-hydration dough; perhaps just spin to combine. Add Yeast and spin briefly, then Salt and spin again -- don't add at same time or the Salt will kill the Yeast (this discussion of the autolyse technique includes the Yeast in that step, delaying only the addition of Salt).

Use higher hydration percentage to encourage more bubbles and lighter texture. The ratio here is already high at 74%, how much higher can we push it?

In the USA, I used no/low-knead techniques with very little yeast and multi-day refrigerated ferments. Could I do the same here? Would it help? This no-knead recipe uses a first cold ferment then second room temperature rise in the pan; she uses 89% (!) hydration, and a higher temperature which might improve oven spring.

While pushing the oil under the dough, the foil tore -- irritating. I used foil in my sheet pans because the bread stuck fiercely, but maybe I can get away without it in this oven tray.

Consider using cold water to offset heat from the food processor.

If I have to reduce the volume of Flour, consider getting a new sheet pan to fit our small oven; the ones I have are dinky and really dinky. Size it for the maximum dough I can get in the food processor.


2025-11-05

Rossejat de Fideus

Rossejat means "roasted" in Catalan, here referring to rice or noodles which have been browned in oil before cooking. We're using short noodles here: "fideus" in Catalan or "fideos" in Spanish. Taste Atlas describes it succinctly: 

Rossejat de fideos is a seafood dish consisting of thin noodles toasted in olive oil, cooked in fish broth with cuttlefish, prawns, or shrimp, and typically served straight from the pan with allioli. It belongs to the same family of seafood-and-pasta preparations as fideuà but has its own character and place at the table.

In turn, fideuà is basically a paella made with short pasta instead of rice. I've written about it it before, with varying degrees of fidelity: Ravalistanall’Assassina, and Casual

This Rossejat is less complex, coming together quickly, especially with thin noodles. It's surprisingly tasty for such simple ingredients.

Note how the short noodles have stood up vertically

This recipe is based on one from Spain on a Fork which has a helpful video. I prefer the thin "angel hair" noodles to the spaghetti-thick fideus; my package indicates they take only 2-4 minutes to cook, rather than 6-12 for thicker ones. I've added some Choricero pepper to the base to enrich the flavor, and topped with sautéed Squid for our dinner. Use a flavorful fish stock; Irene made a richly flavored one I used here. I prepared this in a thin Paella on a portable gas burner, but you can use any pan you like, even non-stick.

This serves 2.

400 ml      Fish Stock
            Olive Oil, extra virgin
250 g       Squid, cleaned
125 g       Fideus, thin, "angel hair"
  3 cloves  Garlic, minced
  2 g       Pimenton Dulce (1 tsp)
  1         Choricero Chili, dry, seeded, hydrated, chopped fine
  1         Tomato, flesh grated, without skin
  4 g       Parsley, finely chopped (1 Tbs)
            Salt
            Pepper

Heat the Fish Stock in a pot to a bare simmer so it will cook the fideos quickly.

In a Paella or other flat pan, heat some Olive Oil, and then sauté the Squid until browned; remove and slice the tubes into rings.

Add more Olive Oil if needed and sauté the Fideos until toasted, a few minutes; stir frequently as they can burn quickly; reserve.

Add the Garlic (and Olive Oil if needed), and sauté until softened. Add the Pimenton and stir quickly and briefly so it doesn't scorch, then add the chopped Choricero and cook for a minute. Add the grated Tomato pulp and Parsley, and cook a few minutes to concentrate the flavor and thicken.

Add the browned Fideos and the Stock, and stir to distribute everything. Crank up the heat and simmer vigorously for a few minutes until the Fideos are barely cooked; don't let them get mushy.  Ideally, the Fideos will be al dente with just a little of the Stock left in the pan; if not, crank the heat or add more Stock as needed. Add Salt and Pepper to taste. Near the end, top with the Squid.  Turn off the heat and cover with a lid for a few minutes to let the Fideos absorb all the Stock.

If you're lucky, you'll notice that most of the strands of Fideos will have stood up vertically. I don't know why this happens but I've seen it in my better attempts, as well as in photos online. 

This should be topped with a zesty Aioli (Rapidísimo, Toum), and served with a strong red wine to stand up to the rich flavors.


2025-09-09

David Lebovitz 3-Day Focaccia

I haven't made bread since moving to Barcelona -- heat, higher energy costs -- but I've got the bug to make a focaccia after having an excellet one from Origo bakery here. David Lebovitz has an excellent blog, and posted on Substack his adaptation of a recipe from Nicola Lamb's SIFT book. I'm waiting for cooler weather to make this, but wanted to save the recipe before I forgot where I put it. Everything below is Lebovitz's writing.


I made this recipe twice. The first time I used the roasted tomatoes that Nicola called for in her original recipe, and the second time, with a higher hydration dough, I simply drizzled olive oil over the top of the focaccia, sprinkled it with flaky sea salt, and pressed some lightly oiled sprigs of fresh rosemary over the top before baking. I used the metrics for this recipe, weighing everything, which makes it easier and more accurate. I also recommend lining the baking sheet across the bottom and up the sides, to ensure the bread won’t stick to it. You may need to use two sheets of parchment to get full coverage. Nicola recommends making bread in a ceramic bowl, which retains warmth better. If you have one, feel free to use it here.

Poolish (starter)

110g (3/4 cup plus 2 tablespoons) bread flour
110g (7 tablespoons) water
Pinch of instant dry yeast

Dough, Part 1

550g (4 1/2 cups) bread flour
460g (about 2 cups) water
2g (2/3 teaspoon) instant dry yeast

Dough, Part 2

50g (3 tablespoons) water
13g (2 1/2 teaspoons) fine table salt, or 15g (1 tablespoon) grey sea salt
2 tablespoons olive oil, plus additional olive oil for handling the dough, preparing the bowl and baking pan, and baking the focaccia

Roasted Tomatoes (optional)

450g (1 pound) cherry tomatoes
1-2 tablespoons olive oil
Salt and freshly ground black pepper
2-3 sprigs of fresh rosemary
Flaky sea salt, such as fleur de sel or Maldon

Part 1 (Day 1)

In a large bowl, make the poolish, a pre-ferment, by mixing together the bread flour, water, and pinch of yeast. Cover the bowl with a kitchen towel and let rest in a warm, draft-free place for 12 hours.

Part 2 (Day 2)

Add the flour, water, and yeast to the bowl and stir until it’s well incorporated. The dough will look a bit dry, which is fine. You may need to use your hands to get everything well mixed together. Cover and let rest 30 minutes.
Mix the water and salt until the salt is dissolved. Add the salted water to the dough and mix the dough with your hands, squeezing it to incorporate the salted water. The dough will be somewhat lumpy and clay-like. Cover and let rest another 30 minutes.
Add 1 tablespoon of olive oil to the dough and incorporate it into the dough by lifting the edges of the dough up and folding it over the olive oil. Repeat, adding the remaining 1 tablespoon olive oil, and lifting and folding the dough over the oil five or six times, until it’s mostly incorporated, although the dough will still be a bit lumpy. Cover and let rise 1 hour.
Again, lift and fold the dough over itself a few times, as in the previous step, until it’s smooth. Cover and let rise 1 hour.
After an hour, check the dough by pulling a wad (about the size of an unshelled walnut) from the top, stretching it. If it tears easily, let the dough rest another 30 minutes. If it’s nice and stretchy and doesn’t break, transfer the dough to a larger bowl, one that’s big enough for the dough to double in, and place it in the refrigerator, covered with an oiled sheet of plastic wrap or an eco-friendly alternative, oiled side down.
Check the dough after about an hour. If it’s really active and puffed up, punch it down. 
Cover and leave in the refrigerator 8 hours or overnight. (I left mine in the refrigerator about 24 hours, to fit my schedule.) Check the dough while it’s in the refrigerator to make sure it’s not coming out of the bowl. Okay to pat it down if it’s getting too high.
If using the roasted tomatoes, you can make them a day ahead or the day of baking. Preheat the oven to 325ºF (160ºC). Cut the cherry tomatoes in half. Place them on a small baking sheet and toss them with 1 to 2 tablespoons olive oil, and salt and pepper. Bake them until they’re completely wilted and cooked through, but not browned, about 40-50 minutes.

Part 3 (Day 3)

Remove the dough from the refrigerator. Line a baking sheet (one that’s approximately 18 by 13 inches/46 by 33cm, but if you have one that’s smaller, okay to use that) across the bottom and up the sides with parchment paper (see headnote) and spread olive oil over the bottom and sides.
With oiled hands, lift the dough from the bowl and place it in the center of the pan.
Spread the dough so it’s covering a little more than three-quarters of the pan, and use your fingers to coax and stretch the dough so it fits and fills the pan. You can gently slide your hands under the dough to help it fit into the pan. Let rise, uncovered, 1 to 1 1/2 hours.
Use your fingers to dimple the dough and let it rest another 30 minutes. Preheat the oven to 475ºF (245ºC).
After 30 minutes, use your fingers to dimple the dough again. If using cherry tomatoes, press them very deeply into the dough, all the way to the bottom of the pan. Toss the rosemary sprigs in any oil left over from the cherry tomatoes, then press the rosemary sprigs lightly into the top of the dough and sprinkle with a not-stingy amount of flaky sea salt.
If you’re just using rosemary, toss some rosemary leaves in a little bit of olive oil. Drizzle a few tablespoons of olive oil over the dough, filling in some of the dimples. Sprinkle the dough with a not-stingy amount of flaky sea salt and press the rosemary leaves and sprigs into the top of the dough.
Bake the focaccia for 10 minutes, then reduce the heat to 425ºF (220ºC) and bake until the top of the focaccia is golden brown, about 10 minutes. Remove from the oven and set the baking sheet on a wire rack to cool.

2025-08-06

Fernet Flank Steak

Perhaps it was a long night, but it occurred to me that the dark amaro (bitter) flavor of Fernet might go well with a strongly-flavored beef steak, especially one with a little metallic edge; think of it like a BBQ sauce for adults. This has just a faint Fernet flavor, certainly not overwhelming.

A slight fernet edge, served with grilled polenta and radicchio

We got a cut that looked like a Flank Steak from Carnisseria Cruz Morales in el Mercat de Sant Antoni; it was 640g so we split it into a 310g piece for this, and the 340g piece for our usual rosemary/garlic marinade.

310 g   Flank Steak, or other flavorful cut appropriate to the grill
100 ml  Fernet Branca
        Salt


Poke holes on both sides of the Steak with a fork.
Sprinkle generously with Salt.
Put in a zip-top bag and add the Fernet.
Marinade overnight.
Pour off the Fernet marinade; optionally reduce and strain for a sauce (it loses its color!)
Grill hot and fast, cook to medium rare.
Slice and serve, with the reduced liquid.


This wasn't overwhelming as I feared, and I wouldn't mind a more assertive flavor. With only 100ml of Fernet, it's not an expensive investment. If I were competing in a BBQ competition, I think I'd use Fernet as a secret ingredient. I'm considering adding Sugar to it next time to give a slight BBQ-sauce-like glaze.

Bay Leaf Ice Cream

I love the smell of fresh Bay, especially when slightly toasted -- it's exotic, herbaceous, slightly fruity -- and I thought it might be appropriate for an unusual ice cream. Fortunately, Irene has a Bay plant the thrives here on our Barcelona terrace, so she gave me a good sized branch. I wanted coax the flavors from the fresh leaves, as well as the aromatics from slightly toasted ones, so I did half-and-half. I doubt this would work with store-bought dry Bay leaves but tell me if you try it.

The procedure was pretty much a basic vanilla ice cream (or our Saffron one), but with the milk/cream first infused with Bay. The taste is appealing, and slightly exotic without being "weird"; it seems like something I'd find in a fancy restaurant. 

The faintest green cast and an inviting aroma

 20 g      Bay Leaves, fresh
300 ml     Milk, whole
400 ml     Cream
170 g      Sugar
    pinch  Salt
  3 whole  Eggs, whipped

Large branch of Irene's Bay plant

Pull the leaves from the Bay branch.
Gently toast 10 g of them in a dry skillet until the slightly brown and begin releasing their aroma.
In a pot, add the Milk and Cream, the raw and toasted Bay leaves.


Cover and let steep on low heat for an hour to infuse.
Strain and capture the Milk/Cream, then add back to the clean pot.
Add the Sugar and Salt to the still-hot mixture, and stir to dissolve.
Whip the eggs.
Ensure the mixture isn't too hot, probably 50c or less, and whisk in the Eggs.
Heat over medium heat, whisking constantly, until it hits 78-80c and the mixture starts to thicken a bit; once it starts, it thickens quickly, so be careful when it's above 70c.
Strain into a large pourable bowl or similar; I use a 1L measuring cup and get about 900 ml.
Cover with plastic film, pressing onto the surface to prevent a skin.
Let cool, then chill overnight in the fridge.
Process with an ice cream churn 20-30 minutes, then scoop into containers, cover directly with film, and freeze overnight.

It helps to let it thaw a little so it's scoopable, maybe 20-30 minutes in the fridge.
Serve.

2025-06-29

Delia's Roasted Red Peppers (from AnnieB)

We went on AnnieB's Almadraba tuna harvest tour, which concluded with a trip to the Barbate Market and a cooking session at her home. This simple, vegetable-forward dish is refreshing, served cool on a hot day. The combination of red bell peppers and tomato, cooked down to intensify, is greater than the sum of the parts. 

Smaller "pimientos de California" here, on foil with little nests to hold them

In Spain, red "pimientos dulces" are everywhere, and are like giant version of the red bells in The States; in fact, vendors here refer to those as "pimientos de California". We also have a huge variety of tomatoes, including really tasty "blau" (blue) ones. The olive oil and anchovy provide richness and umami, but you could omit the anchovy for a veggie/vegan version.

The quantities below are good for a side dish for two people.

 1 large   Spanish Red Bell Pepper (or 2 smaller American red bells)
 4 leaves  Basil, torn in half
 2 filet   Anchovy, cut in quarters or so
 1 clove   Garlic, sliced thin
 1 medium  Tomato "blau" or other tasty variety, cut into 4-8 pieces
30 ml      Olive Oil, good quality (2 Tbs)
           Black Pepper

Preheat the oven to 180C / 350F.
Cut the Pepper in half, top to bottom, through the stem, preserving the bowl shape to it will retain juices;
carefully remove the seeds and white pith.
Place on a baking sheet lined with parchment, or foil if you don't have the paper, but it may stick a little.
Divide the Basil, Anchovy, and Garlic slices between the Pepper halves.
Top with the cut Tomato pieces to protect the Basil and Garlic from burning.
Douse with the Olive Oil on top, then grind some Black Pepper.
Make sure the Pepper halves are upright to contain juices as they cook; cr
Bake at 180C / 350F for about 45 minutes until they are slightly charred: the tomatoes will release juice then it should concentrate down over time and intensify the flavor.  You can do this on a BBQ as well but it's rather easy to scorch the bottom.
Carefully transfer to a platter to keep all the tasty juice, possibly on a bed of Arugula or other green.
Serve warm, or let cool.


2025-06-26

Chicharrones de Cádiz: tender, light, and tasty (not crunchy "pork rinds")

We had this traditional tapa in Cádiz at Arte Puro (de Taberna Casa Manteca) and I was immediately taken with it: tender slices of pork belly seasoned with spices including pimentón, garnished with olive oil, lime, and salt, and served barely cool. They were surprising refreshing, great on a hot day. 

Sliced thinly, dressed with olive oil, coarse salt, lime

We found some in Barcelona at El Corte Inglés "Gourmet Club", but they were a pale imitation: a bit dry, not terribly flavorful -- I wouldn't have been so interested if these were the only ones I'd tasted. 

I had to figure out how to make them at home! Feel free to skip to the Approach or the Recipe, or follow along.

In Cadíz: moist and delicious!

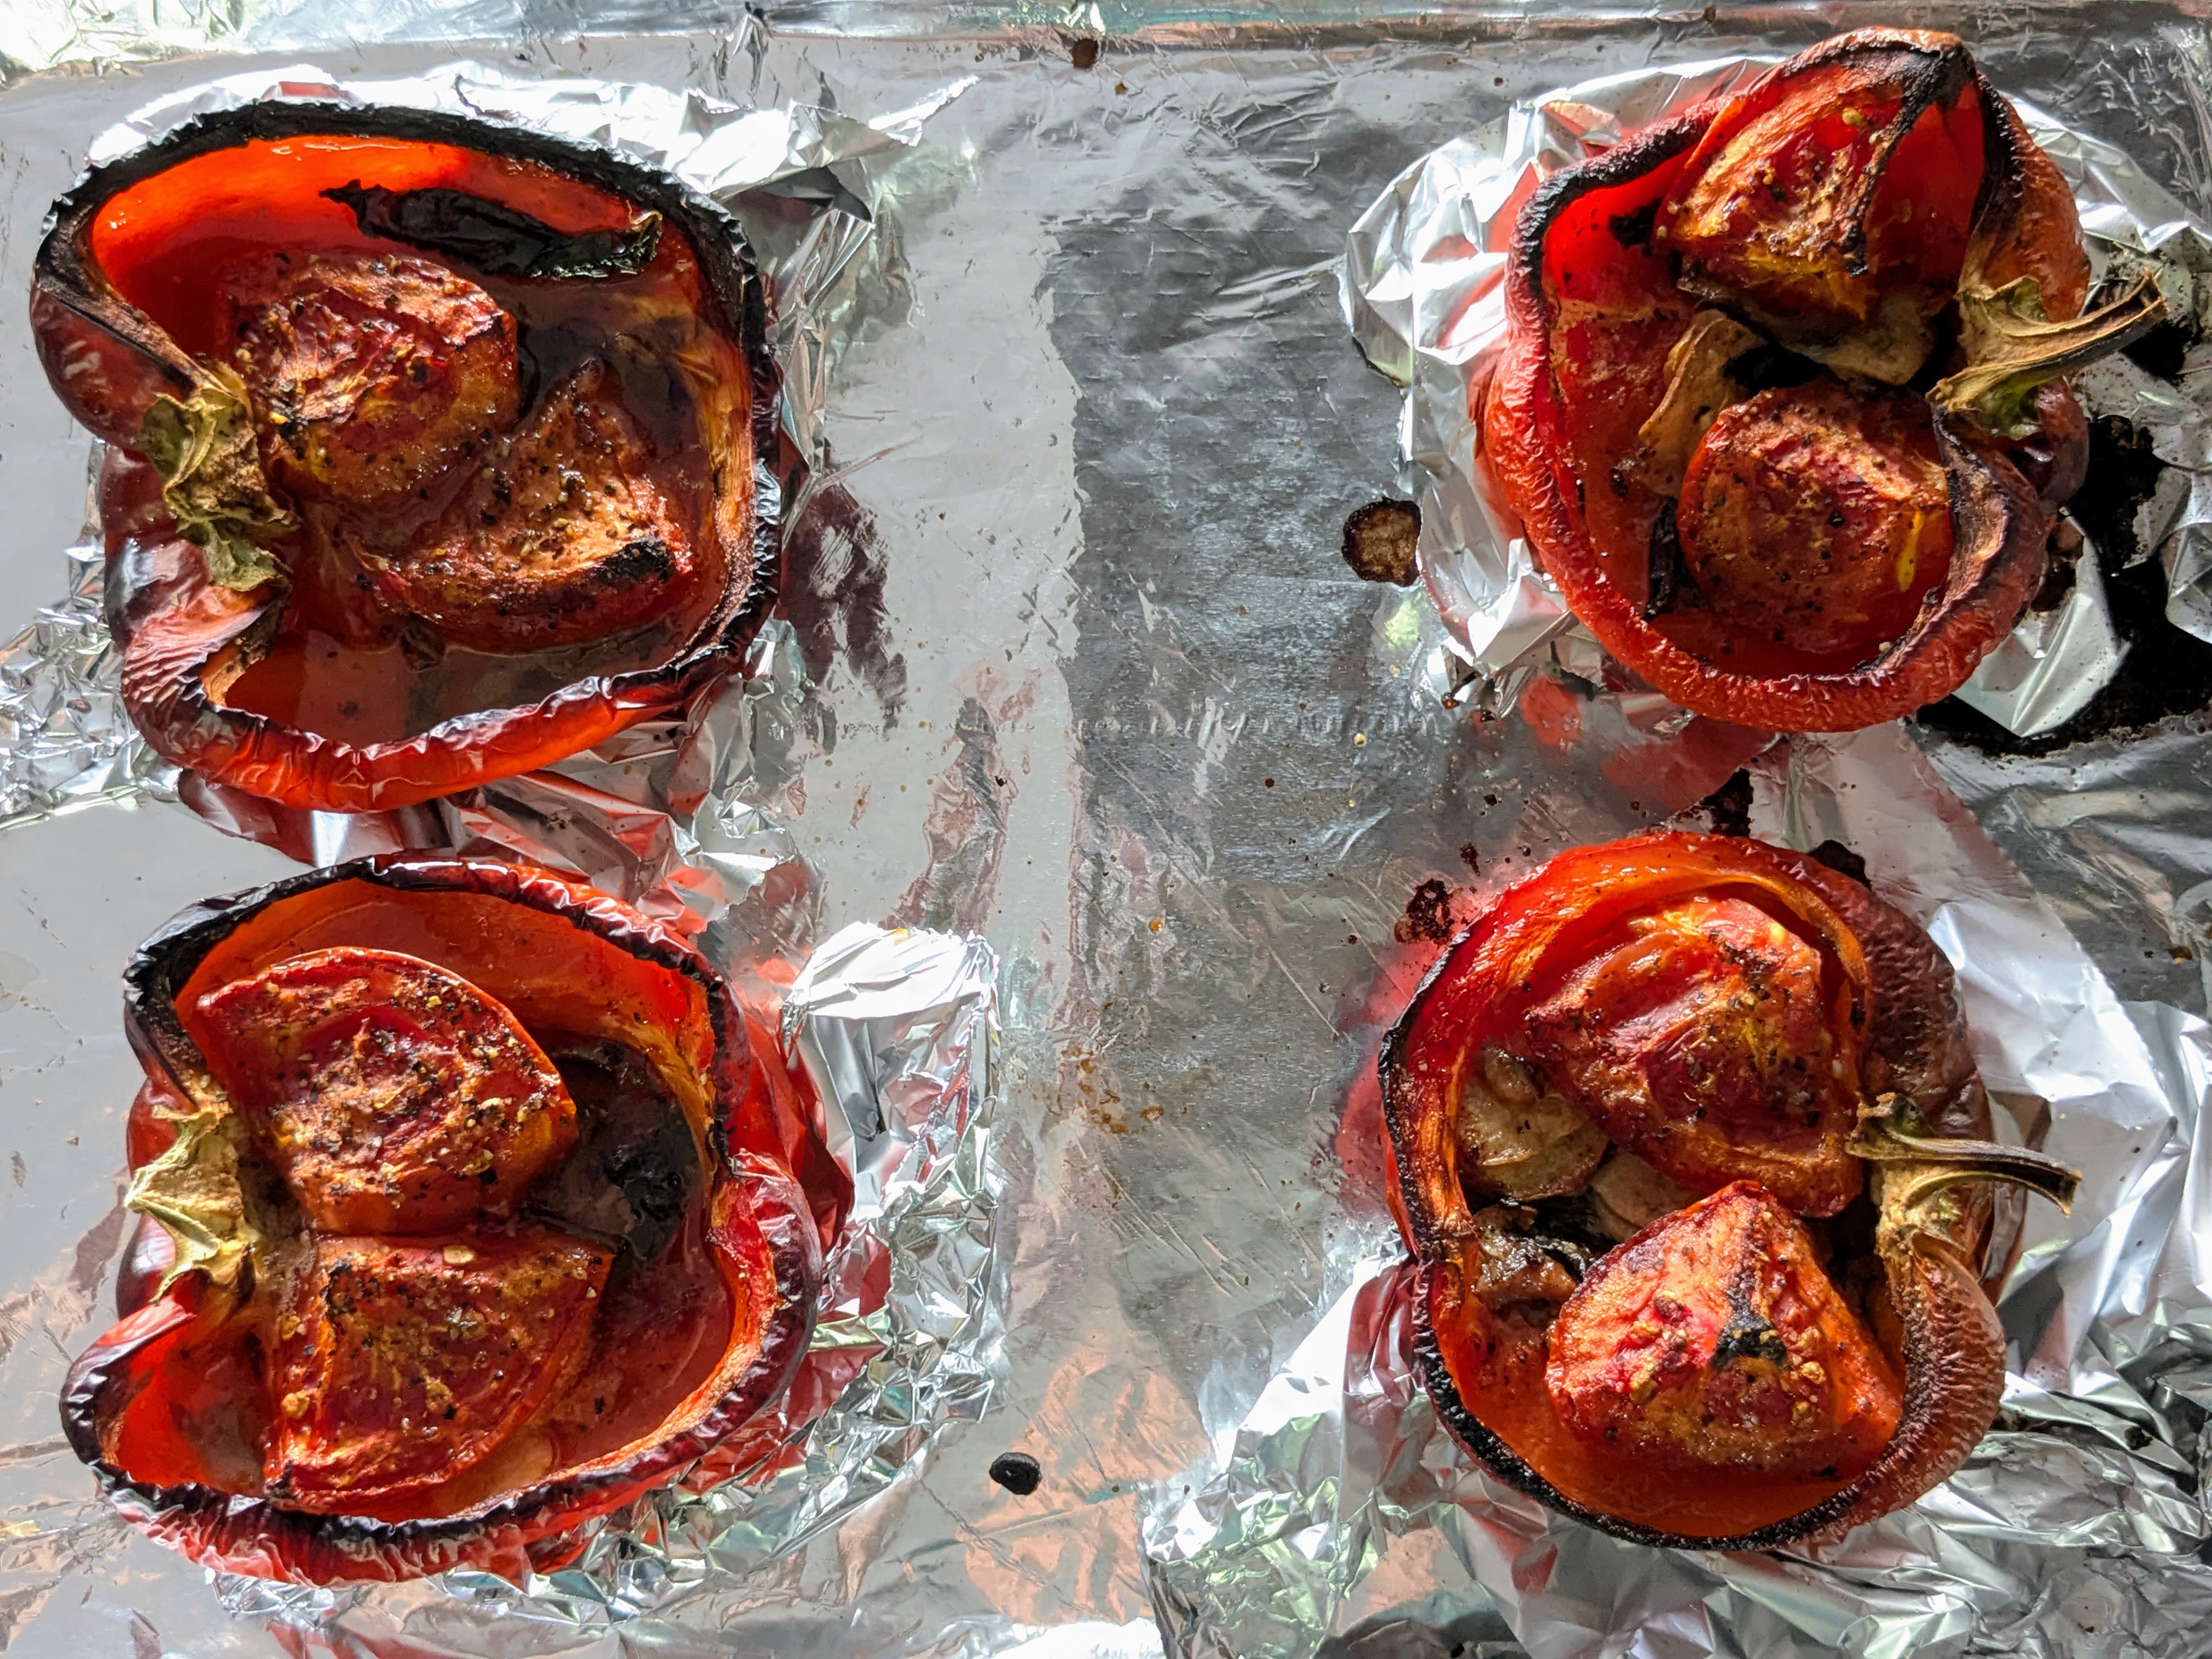
Dull from El Corte Inglés, oddly with coriander, cumin, vinegar

Research

There are so many variations, which just points to the fact that this is a very old and common dish, and everyone makes it their own way.

General

Chicharrones de Cádiz: cómo son y dónde comerlos mentions two places we went, including the place we ate these, but doesn't provide a recipe or technique. These are pieces of pork belly [panceta], a "marbled" area of ​​the pork that alternates layers of meat with fat. This gives the pieces a special succulence. Butchers call them "pear belly" because of their shape, which is reminiscent of the fruit.

Chicharrones de Cádiz talks about the prep in general. Iberian pork belly has a better mix of fat and a more intense flavor than regular pork belly. They use white lard (manteca) for cooking, seasoned with garlic, oregano, paprika, salt, and other optional seasonings. Substituting Olive Oil for the Lard may result in a different result in terms of texture and flavor, but it is still a valid option for those who prefer a less traditional cooking method. Another modern adaptation of the recipe involves adding lemon and peppers to the pork rinds during preparation, adding a citrusy and slightly spicy touch that further enhances their flavor.

El País has a video La tapa más especial de Cádiz which starts at the Casa de Manteca, then goes to the producer who says the panceta is trimmed then cooked in manteca for 90 minutes on medium heat, and seasoned with oregano, garlic, salt, garlic, bay laurel, pimentón.

Cooked in Manteca, Sometimes Boiled First

Chicharrones loncheados de Cádiz cooks the panceta an hour in manteca seasoned with salt, garlic, oregano, and pimentón.

Chicharrones especiales o chicharrones de Cádiz is similar to the previous, using pear-shaped ("pera") panceta. They do not use pimentón, and cook in "pella de cerdo" (pork rind) or white lard.

Receta de Chicharrones de Cádiz caseros adds "laurel" (bay leaves) and black pepper, and starts cooking in water about 30 minutes until it evaporates, then cooks the panceta in its own fat with the seasonings for another hour, then further cooks it in reduced wine and seasonings. This one sounds interesting, but unnecessarily complex.

Two videos I've seen saute garlic in oil then brown the panceta on both sides, then add white wine, bay, salt, then cover with water and simmer 30 minutes. This one then fries in manteca to brown, but uses a huge amount of manteca to do it; oddly, there's no pimentón.  Another cooks only in seasoned manteca for 90 minutes, but it looks a bit more dry and shreddy than I'd like. 

Dry- or Paste-Seasoned then Baked

Receta de chicharrón de Cádiz casero coats the panceta with a paste of garlic, oregano, pimentón, and salt with a bit of olive oil, then bakes at 200C for up to an hour, basting in the fat it releases. This certainly saves on having a liter of manteca.

This "short" looks super-simple: a 3-hour marinade in oil and spices then bake at 200C until crunchy. It seems similar to the previous one.

This video, in English, is from an NYC chef does a dry cure similar to bacon (with some sugar, oddly) for 1-2 days, then adds some pimentón and roasts at 250F/120C for 90 minutes; it looks pretty decent.

Dry Rub then Sous Vide

Anova's Chicharrones de Cádiz uses sous vide, which allows us to reduce the lard to just enough for flavoring. He cooks at 60C for 30 hours (!) with the lard and spices, then sears to brown before slicing. The article's in English and the author is originally from Madrid, so I'm giving some him credit for authenticity.

Approach

I did a flavor trial with a spice mix of Salt, minced Garlic, Oregano, Pimentón, and a couple fresh Bay leaves coating a pork tenderloin. I cooked it sous vide for an hour at 58C, then finished on the BBQ. The flavor was good, if a bit timid; the Pimentón was welcome and I was really fond of the Bay.

Boiling in water is about the last thing I'd want to do with meat -- too much flavor loss, no flavor gain; if the goal is to cook through, just do it in tasty Manteca. It seems to me that flavoring a pot of Manteca with seasonings isn't going to impart much flavor to the meat, even if it's the most traditional method. A dry rub/cure or paste, followed by baking, seems like it would retain all the flavor and give a bit of crunch, but it obviates the Manteca flavoring. Searing in Manteca after cooking might burn any spice coating, so watch out for that.

The Anova Sous Vide recipe seems a good compromise: the dry rub is like the baked recipes above, but adding chunks of Manteca for traditional flavor; the final sear in Manteca should give it an appealing crust, hopefully without burning any spices. I could also try blooming the spices in hot Manteca then painting that onto the Panceta before cooking sous vide, it's one extra small step. 

Recipe

I got a 750 g piece of Iberian Panceta from Xarcuteria Neus in our Mercat de Sant Antoni and had them remove the skin; it was 14€/Kg. Irene has tubs of Manteca, because she's Irene. I'm cutting the Anova sous vide recipe in half here, but keeping his original quantity of Bay and Pimentón because I love those flavors.

750 g       Iberian Panceta, skin removed
0.7 g       Oregano, dried (1 Tbs)
 10 g       Salt (2 tsp)
5.6 g       Pimentón Dulce (1 Tbs)
  3 cloves  Garlic, minced
  4 leaves  Bay, fresh 
 45 g       White Manteca, cut in chunks
 ?? g       White Manteca, for searing, if needed
            Lemon juice, fresh, for garnish
            Coarse Salt, for garnish
            Extra Virgin Olive Oil, for garnish

Heat a sous vide water bath to 60C.

Combine the Oregano, Salt, Pimentón.
Mix in the minced Garlic and smear into a dry paste.


Spread a large sheet of plastic film and lay the Panceta on top.
Rub spices into both sides of the Panceta as evenly as possible; it's difficult because this isn't quite a dry rub nor a smooth spreadable paste.
Lay on the Bay leaves and Manteca chunks, again on both sides.
(Maybe these, except for the Manteca, could all be blitzed in a spice grinder?)


Wrap the plastic film tightly around the Panceta.
Seal in a sous vide bag and cook 30 (!) hours at 60C.


While still warm, remove from bag and dry with paper towel.
Save the tasty liquid and fat from the bag, we used it to serve black-eyed peas as a side dish.
Score the fat to allow rendering than sear slowly in skillet, fat-side down, with a little more Manteca until appealingly golden; flip and sear the meaty side just a little, don't overcook it. We probably didn't need the Manteca here since the fat rendered quite easily. 


Chill well, then slice as thinly; I was able to get about 2mm slices but a meat slicer would give even more tender 1mm slices.


Plate and garnish with coarse Salt, a squeeze of Lemon, and some good Olive Oil. 
I used Lime, but Lemon would be more harmonious.
Serve with mini bread sticks, called "picos" in Spanish or "barretes de pa" in Catalan.

Results

I got better at cutting thinner slices, and it was more appealing -- more refreshing. The spice rub was not nearly as pronounced as I was expecting, and perhaps hoping. But we returned to it again and again, especially as a lunch or Hora de Vermut treat.

Next Time

I'd probably keep the same spicing for now. Maybe use dried/granulated garlic to make the rub easier to apply. Definitely score the fat side -- diagonally or perpendicular to how it's going to be sliced -- to allow the spice rub to penetrate more. 

2025-08-03 Scored, with Powdered Dry Rub

I got another cut from Carnisseria Carmen, also el Mercat de Sant Antoni; it started at 640 g, and after removing the skin, was 540 g. I tried to maximize the flavor by diagonally scoring the fatty side (just to the meat) and also scoring the meat side slightly, perpendicular to how it will be cut when serving. I whizzed all the ingredients so I had a dry rub, and pressed them into the flesh after painting it with liquid Manteca.

540 g       Panceta Iberica (trimmed weight)
 40 g       Manteca, melted
  4 leaves  Bay, fresh
 10 g       Salt
 10 g       Garlic granules (coarse powder)
  6 g       Pimenton Dulce
  1 g       Oregano, dried

Score the fat side of the Panceta in a diagonal pattern, just through the fat to the meat;
barely score the meat side perpendicularly to the way it will be sliced.
Lay the Panceta on a large sheet of plastic film to contain everything.
Melt the Manteca and paint it on both sides of the Panceta, it will firm up as it hits the cool meat.
Grind the Bay and dry spices in a spice grinder, and dust both sides, pressing into the Manteca and the scores.
Wrap tightly in the plastic film and chill well so the fat firms up.
Seal in a sous vide bag.
Proceed as above: cook sous vide 30h @ 60c, sear briefly, chill, slice, and serve.


2025-06-23

Lemon mint sorbet

We like the Grapefruit Rosemary sorbet I make, and I've got a little lemon tree and mint growing on the terrace, so let's try something with those. 

Lemon sorbet with Nona's Liqueur #3

The proportions below come from Harold McGee's table in "The Curious Cook", chapter "Fruit Ices Cold and Calculated":

Flavor        Fruit  Sugar   Lemon  Water
-----------   -----  ------  -----  -------
lemon, hard   1/2 C   8 Tbs  0 Tbs  1 1/4 C
lemon, soft   1/2 C  14 Tbs  0      1     C

Let's go with the "soft", and convert to metric:

118 ml Lemon juice
177 g  Sugar
237 ml Water

I've got 2 lemons left on my tree. Serious Eats uses 4 lemons to give 3/4 C juice (180ml) for the Lemon Tart I make, so I expect to have about  90 ml juice, so I'm scaling the above by 76%. 

        Zest of 2 lemons
135 g   Sugar (I used 121 g Palm sugar
180 ml  Water
 19 g   Mint leaves, roughly chopped to expose oils
pinch   Salt
 90 ml  Lemon Juice (2 tree lemons and 1 store-bought lemon)

Zest the 2 Lemons, chop the Mint Leaves, and add to a pot with Sugar, Water, and Salt.
Bring to simmer to dissolve the Sugar.
Cover and let it infuse 15 minutes and cool.

Juice the Lemons by rolling them firmly on the counter to loosen the juice;
use a reamer or lemon squeezer to get as much juice as possible.
Strain the Sugar solution into the Lemon Juice.
Chill overnight.
Churn in an ice cream maker.
Cover and chill overnight.

This tastes excellent -- the mint really comes through, without being grassy. 
The texture is good, smooth and not too hard. 
But it melts very quickly -- consider backing out the Sugar a bit, or adding something that will prevent the syneresis.


2025-06-14

Nona's Liqueur #3

This is a simple but tasty drink that reminds me of something Italian grandmothers might make. It uses leftover skins and husks of citrus. It's quite pleasant on its own over an ice cube, and should make a bright spritz cocktail. It's easy, it just takes patience for the infusion.


We accidentally discovered a technique to make a citrus liqueur then made it intentionally. Subsequently, we simplified by collecting citrus skins from our fresh-squeezed orange juice, lemon and lime husks from cocktails, etc, and infusing clean-tasting vodka.  I'm repeating that here, with husks from our little lemon tree, skins from mandarin oranges, and so on. I expect to adjust based on what we have, and what tastes good. 

 12    Lemon husks (with or without zest, whatever we have)
  ?    Mandarin skins
  8    Lime husks
  2    Bay leaves
 1+ L  Vodka, clean tasting; I used Stroika from our supermarket
250 g  Palm Sugar

Stuff a 2L flip top jar with as much of the citrus peels as you can fit, add the Bay, then fill to the top with Vodka.

Let sit a month, turning occasionally.

Strain through coarse sieve. Squeeze the remaining pulp in your hands to extract a lot more infused Vodka.

Filter all the liquid through a fine mesh; I used a plastic cone coffee filter, but you could use a paper filter or fancy chinois.  I ended up with 1.3 Liters of flavored Vodka.

For my Vermut, I make a caramel, and may do so next time but I had Palm Sugar lying around so I used that since it already has a dark flavor reminiscent of caramel. For that caramel, I used 22% by weight of sugar to the liquid, and I had almost enough Palm Sugar, so I just used what I had.  Add the Palm Sugar, cover, and let sit until dissolved. 

Store in bottles for easy drinking, over ice, with a splash of sparkling water, perhaps even some cava.

This batch had an appealing citrus aroma. The sweetness was fine: not to austere nor too sticky. The  bitterness of the pith offset balanced the sweetness and gave it an amaro edge.

I think using plain white sugar would be a bit insipid, so next time might use caramelized sugar if I don't have palm sugar.

We've been enjoying Nona Spritz: 2 to 4 to 1 of Nona's Liqueur, Cava, sparkling water -- with ice.

Nona Spritz: very refreshing

2025-07-16 - 2025-08-16 Nona's Liquour #4

That was so good, we should always have it around the house. This time, I didn't use the Bay Leaf and used caramelized Sugar.

  1 Kg  Citrus husks (lemon, lime, orange)
  1 L   Vodka (clean tasting like Stroika)
250 g   White Sugar
 75 g   Water

Soak the Citrus husks completely covered in the Vodka for a month; I used a 2 L bail-top jar.
Squeeze, strain, and filter: I got 1.4 L of aromatic liquid.

Put the Sugar in a small sauce pan, add the Water, and bring to a boil;
don't stir, just let it reach a golden state at 188C/370F, then pour it onto a nonstick sheet to cool.


Roll it up or break it into pieces and place in the filtered liquor; let it dissolve.
Swirl to combine, serve.


2025-04-22

Mashed potatoes, spinach, Arzak egg, bottarga -- after Bar Tiramat


My rendition: potatoes, spinach, Arzak egg, grated bottarga

Bar Tiramat opened recently near us: a great place for imaginative, well-crafted food, and good wine. They had an unusual dish: Huevo con Kimchi y Bottarga 6€; it's a beautiful presentation with a poached egg on top of bright red kimchi, topped with grated dry fish egg. I like how the salty bottarga went with the egg, but didn't think the kimchi was a great marriage. I wanted to do a riff on it.

Bar Tiramat's kimchi, egg, bottarga

In Catalunya, trinxat is quite popular -- a mash of potatoes and cabbage. Eggs go with potatoes, and Eggs Benedict adds spinach, so that will be my base. Tiramat poached their egg, but here I used chef Arzak's technique -- wrapping in plastic and simmering gently to maintain form. We have bottarga from the Mercat de Sant Antoni, and sometimes make an intense pasta cream sauce with it. 

I made up the recipe, since it was composed of individual parts that are all pretty simple.

Defrost frozen chopped Spinach, squeeze to remove excess water. Warm in a pot or pan with a bit of Butter or Cream; grate a bit of Nutmeg if you want to suggest creamed spinach.

Prep the Arzak Eggs: take a 25x25cm sheet of cling film and press the center into a small ramekin or bowl. Spread with Olive Oil. Break an egg into the center, without breaking the yolk. Dust with salt and pepper, and add a bit more Oil. Bring the corners of the film together and squeeze to remove the air, then twist to seal, and hold closed with clothes pegs. 

Slice unpeeled potatoes about 1cm so they'll boil quickly and evenly; start them boiling. During the last 6 minutes of the boil, or a bit more, drop the temperature to a very gentle boil and add the Arzak Eggs. Cook 6 minutes then remove to prevent over-cooking and setting the yolks. Check the potatoes, and cook until a fork pierces without too much resistance. Drain the potatoes, add a bit of Cream or Butter to the still hot pot, and rice the potatoes into the pot; combine with a spatula, and adjust Cream and Salt.

Put ring molds on plates and scoop the mashed potatoes into each, tamping down when about half full; if you don't have a lot of Spinach, add more potatoes.  Top with the Spinach, and smooth down, creating a slight well at the top.  Remove the ring molds. Unwrap each Arzak Egg and add on top of the Spinach. Grate the Bottarga on top, strewing it attractively on the plate. Serve.

Also called "flower eggs" due the shape of the top

Break the yolk, it should be quite runny

How was it? Changes for next time...

The ring mold gave it a nice shape, and the egg texture was good.

The grated bottarga was soft, almost waxy when grated; perhaps we could plane off thin strips instead. I'd like to find a much harder, parmesan-like texture and grate finer. We could switch to mojama, the dried salted tuna which is quite hard. 

It needed some texture, something crunchy -- which at Tiramat was hinted at by the kimchi. Perhaps add crunchy fried onions (Ikea sells them by the pillow case!) or toasted seeds/nuts (perhaps pine nuts or pistachios). 

2025-03-11

Helado de Ajo Negro (Black Garlic Ice Cream)

Years back, Black Garlic seemed to be a secret amongst geeky pro chefs, and making it involved multi-day low temperature cooks. Now we're finding it in regular grocery stores for reasonable prices. It has a surprising and appealing sweet flavor, without the bite you might expect. I thought it might make an intriguing ice cream, and it turns out, lots of others are doing this too -- some with additions of vanilla, chocolate, honey, even 36 variations. I want my first version to be pure and direct, to showcase the ingredient; perhaps later, I'll add complementary flavors. 

Sidebar. The first Black Garlic we got here in Barcelona (from Mercadona) was in a plastic tub which contained peeled cloves with a great fruity flavor: a bit tart and a bit sweet, kinda like a like a date or tamarind, maybe a hint of balsamic vinegar. The 60 g jar we got from Consum was a surprise when I opened it for this project: it had a distinct note of garlic and not as much of the sweetness we had earlier, it might go well with chocolate, but it's too garicky for a solo tour. We went on a quest to find more sweet/tart ones and found it only in whole head form: at Ametller and Bon Preu (from the same producer and same 5€ price),  and 8€ at Fruiteries Borau (a different producer). All three contained 2 whole heads, and peeling them was not terribly easy: they were soft and sticky enough that they didn't pop out of the peels easily (I even tried freezing the heads first).  The whole heads had less overt garlicky smell and taste than the Consum jar, and I had a slight preference for the fruit of Ametller/Bon Preu brands. You might want to buy a couple different brands to find the most appealing flavor before you embark on this recipe, and get the peeled if you can; you can use less-fruity ones in savory dishes.

Most recipes I've seen mash the Garlic into a paste; this no-churn recipe just steeps then discards the cloves. Some use 1-2 Tablespoons of paste for 2.5-3 Cup of Milk and Cream; here, I'll use more for a pronounced flavor. I'll use the proportions of dairy and sugar that I use for my Saffron Ice Cream.

 70 g      Black Garlic cloves, peeled (from two peeled heads)
  3 whole  Eggs, whipped
300 ml     Milk
400 ml     Cream (35% fat UHT is what I used)
170 g      Sugar
  1 pinch  Salt

To give it some texture, mash two-thirds of the Black Garlic cloves to a paste;
slice the other half and reserve for adding at churn time.
Whisk the Black Garlic, Eggs, Milk, and Cream together in a large saucepan;
whisk in the Sugar and Salt.
Heat over medium, whisking frequently to prevent the milk from scalding, and watch the temperature.
Bring the temperature up to 78-80C / 175-180F, stirring constantly until thickened and a custard is formed, maybe 10 minutes; close to the final temperature, it will start to thicken quickly so be careful; the mixture should coat the back of a spoon. 
Transfer to a 1 Liter measuring cup with a spout and let cool.
Cover with plastic wrap, pressing the film onto the surface of the custard base to prevent a skin forming.
Chill overnight. 
If you have a frozen-canister ice cream churn (like this Duronic frozen-canister style I bought recently), freeze the canister overnight as well.

The next day, pour the base into a chilled churn; while churning, add the reserved sliced Black Garlic.
Churn for the recommended time, usually 20-30 minutes.
Distribute into freezer containers, cover the top of the ice cream directly with plastic film, cover with lids, and freeze overnight.

Before serving, check out the texture: you might want to let it thaw 15-30 minutes in the fridge to provide a scoop-able texture.

Small scoops served in pastry shells


Funny that this popped up in my Duolingo Spanish lesson -- maybe she should have used Black Garlic instead of fierce normal garlic.


2025-02-03

Waffle "Cake": Eastern European crunch and sugary sweetness

A new shop opened near us, Senzi Aliment, a delightful combination of Eastern European (CIS: Commonwealth of Independent States), Italian, and Spanish ingredients. I spotted stacks of waffle-like crackers -- the texture you'd find inside KitKats, which I find irresistible -- and knew I had to figure out how to use them. They're the size of dinner plates, so looked like you might turn them into some cake-like dessert. I asked the proprietor and he grabbed me a can of Dulce de Leche, and pantomimed how you'd spread it on each waffle cracker, then layer them. 

I made a simple version with a quarter of the waffles I got and it was OK but not stunning. The waffles had lost their crunch, which was not surprising -- they sublimated into the sugary mass -- but I'd have preferred if they could have somehow retained a crunch. But it was fun and trivial to make, and introduced me to something I'd never heard of. 

Alternating cocoa and plain waffles, dulce de leche and sweetened condensed milk

Some web searching on the name on my receipt, "vafli tarta", resulted in a mix of recipes in English (8 waffles with butter and cognac and Peters Food Adventures with 5-10 waffles with several additions, good pictures), Bulgarian (adding walnuts, chocolate, cream)Ukrainian (5 waffles, variations with butter, or sour cream, or custard), Latvian (adding chocolate and mascarpone), Latvian (9 waffles, coffee powder, nut garnish), and others.

The approach is the same: spread the waffle crackers with Dulce de Leche and/or Sweetened Condensed Milk (with optional flavors), and layer them, then chill for a few hours in the fridge. Some make Dulce de Leche by boiling Sweetened Condensed Milk for three hours, but we can buy it here.

I expect the butter, cream, and booze make the Dulce de Leche easier to spread. Chocolate seems a natural addition, and the acidity of fruit would add a welcome balance. If the top or sides are spread, chopped nuts would make for an elegant presentation. 

My 90 g package of "Vafelu Plaksnes Tortem Ar Kakao Garsu" from Ukraine contains 9 waffles: 4 cocoa colored and 5 cream color, about 20 cm in diameter.

Even with additions, it sounds absurdly sweet, and the two of us couldn't finish the 9 waffles and 9 layers of sugary spread. At least not the full cake sized waffles! Peters Food Adventures says it can be cut then frozen for storage, but still, it's a lot. I think the height is attractive, so I'll cutting them into quarters so I can try variations. I had a can each of each spread, and for my 1/4 version, didn't use even a quarter of either can; I don't know how much I actually used, so can't give measures below.

My quartered preparation here made 4 generous slices; a full stack would provide 16.

1 90 g package Vafli Tarta waffle crackers (stack of 9)
1      can     Sweetened Condensed Milk
1      can     Dulce de Leche
               Toasted nuts (optional)

While still wrapped -- holding everything snugly --  use a bread knife to cut the stack of waffle crackers into 4 wedges; save three of the stacks for later flavor combinations.


Spread the Sweetened Condensed Milk on the 5 cream colored wafers.
Spread the Dulce de Leche on the 4 cocoa colored wafers.
Stack, alternating colors.


I ended up painting the top wafer by mistake, so I'll top it with chopped nuts for services.
Cover with cling film, add a weight, and let chill in the fridge for a few hours or overnight.


Top with toasted ground Almonds or other nuts you have on hand.
Slice with a bread knife, and serve -- ideally with big mugs of strong coffee.


The toasted almonds helped provide some of that crunch; I could mix some through the layers next time.
I'll probably add some tart jam (raspberry, cranberry, marmalade) in with the Dulce de Leche, or replace one of the spread layers. None of the cocoa flavor came through from the waffle; if you're looking for that, add some grated intense chocolate.

I've made further variations on this with subsequent 1/4 waffle sets.

The first used a couple layers of home made cranberry/ginger relish, which was a good bright accent, but made the waffles softer than I wanted. 

For the second, I finely grated 90% cocoa chocolate onto the inner Condensed Milk layers: the taste was good but the dryness of the chocolate dust caused the waffles to want to delaminate -- mix it through a bit next time.

For my final 1/4 package of waffles, I'm thinking of peanut butter and the remaining chocolate, or tart tamarind concentrate, or bitter marmalade.