2021-11-22

Blue Cheese Straws


From John Martin Taylor in Gastronomica, Fall 2008, who
bases his recipe on a survey of old southern recipes. Also in https://www.washingtonpost.com/recipes/john-martin-taylors-blue-cheese-straws/13436/.


We used a delightful, intense, creamy French Blue (from Costco) for this, and the result was good, but in the straws, it loses some of its unique quality as an eating cheese, it's blue-ness. We've also used a Cheddar and a mix of Cheddar with Pecorino with fine results.


With a processor, this comes together very quickly. I grate the hard cheeses in the processor, but just crumbled the softer Blue. I then rolled the dough between sheets of cling film and cut with a pizza wheel or pastry scraper; both worked well, but the scraper made transferring to the parchment easier.


113 g  8 ounces Blue Cheese

 56 g  2 ounces Unsalted Butter, cut into chunks (half stick, 4 TBS)

   1/2 tsp Salt, plus more for garnish 

1/4 tsp Cayenne pepper, plus more for garnish

145 g  1 cup All Purpose Flour (preferably soft Southern)

1 Egg Yolk (if needed for moisture)


Preheat oven to 375F (or 350F convection).

Line 2 cookie sheets with a Silpat or parchment so straws don't stick.

Crumble or grate cheese in a food processor.

Combine all ingredients except egg in processor with metal blade and process a minute or two until it forms a ball. 

If it's too dry, add the Egg Yolk (some recipes use a bit of Milk or Buttermilk).


Divide into two batches.

(Many recipes chill the dough for 30 minutes at this step, try if you've got a hot kitchen)

Roll into 1/8 inch thick slabs about 6-inches wide between sheets of cling film;

I use a rolling pin with thick O-rings on the ends for even thickness.

Garnish with Salt and Cayenne, roll once lightly to press in.

Cut into 1/2 inch wide strips, each 6 inch long.

Lay out on cookie sheet, with strips not touching.


Bake 20-25 minutes until just lightly brown.

Cool on rack.


2021-10-25

SER's Beet Gazpacho with Goat Cheese Foam and White Anchovies (Boquerones)

At a recent dinner at SER, we had a beet gazpacho topped with Cabrales cheese foam, garnished with white anchovies. We've re-created it here, using goat cheese, and it turned out wonderfully -- earthy, rich, not too beet-y, and the cheese foam and anchovies elevate it to restaurant level. For the gazpacho, you'll need a powerful blender for a smooth texture, and for the foam, you'll need an iSi whip cream siphon. We got a large tub of Boquerones from a restaurant supply store. 

Make the gazpacho and foam, and chill both. Plate the gazpacho then top with foam and boquerones; garnish with grind of black pepper.


Beet Gazpacho

I started with recipes from the New York Times and Washington Post.  The quantities below don't need to be exact, but these (barely) fit in our vintage Vitamix blender. We normally sieve our tomato gazpacho but didn't feel the need for that here.  Pre-cooked and peeled beets made this very quick, and we used canned tomatoes because it's now after tomato season; you could cook and peel fresh beets and use fresh tomatoes, of course.

500 g        1 pound   cooked and peeled Beets, roughly chopped
400 g     14.5 ounce   canned crushed Tomatoes, unflavored
225 g      1/2 pound   English Cucumber, skinned, sliced
1/4                    Red Onion, sliced
1/2                    Red Bell Pepper,  sliced
  4 cloves             Garlic
 60 ml     1/4 C       Extra Virgin Olive Oil
 30 ml       2 Tbs     Sherry Vinegar (to taste)
 10 g      1/2 Tbs     Kosher Salt (to taste)

Add the Beets and Tomatoes to the blender and blend, adding the other ingredients one by one. 
Blend until very smooth.
Taste and adjust Salt and Vinegar.
Chill for at least 2 hours.

Goat Cheese Foam

I used this recipe, cutting it in half for a few servings, but you'll need to double the below quantities to provide for the amount of gazpacho above.  We have a little 0.25 L iSi, which is fine for this amount, but you'll probably need the 0.5 L model for a double batch. If you have any flecks in your ingredients (pepper flakes or herbs in the cheese) you will need to sieve it to prevent clogging the iSi, but our cheese was plain so we didn't need to. Here too, the quantities don't need to be exact. The small amount above was too little volume for our Vitamix so I used a stick blender; a food processor might work, but might also be too large for this amount.

125 g     4.4 ounce  soft Goat Cheese
 65 g     2.2 ounce Sour Cream
 11 ml   0.75 Tbs  Extra Virgin Olive Oil
  5 g     3/4 tsp Kosher Salt
 65 g     2.2 ounce Heavy Cream

Blend the Goat Cheese, Sour Cream, Olive Oil, and Salt until smooth.
Add the Heavy Cream and blend briefly to combine (you don't want to whip the cream yet) or stir in thoroughly.
Load it into the iSi Whipper: I filled a ziptop bag then snipped off the corner and used it like a pastry bag to get the thick cream mixture into the whipper.
Add the lid, and charge with 1 Nitrous Oxide cartridge (2 for a 1 L whipper).
Chill for at least an hour


2021-10-15

Smoky Pork Chili

In the past two chili competitions our friends host, we've come in #2 and #1; we hope to keep our crown this year with a pork-based chili that focuses on smoke.  It uses smoked pork, smoked oil, smoked tomatoes,  smoked tomato water, and smokey chilis. 

TL;DR: we came in tied for 2nd place in this year's competition!

Smoked Tomatoes and Tomato Water

We got bulk tomatoes from the farmers market. 
To skin easily: freeze hard, remove, and soak each for a minute or two in water.
Nick the skin in an X at the bottom and peel it off; it should slip off pretty easy, but if not, let soak a minute more and try again.
While still semi-frozen, cut each in half at the equator.
Put on wire racks, cut-side down, over trays (like lasagna pans) to catch the drips as they thaw and smoke.
Cold smoke several hours.
You may be able to do this while you smoke the Pork and Oil below, if you've got lots of room.
Keep the tomatoes and water to make the chili.
Both are great for other uses, and the smokey water makes a fantastic Bloody Mary.

Pork

   1 Kg   2 Lb  Pork Shoulder, with a moderate amount of fat
   1 L    1 Qt  Olive Oil (as much as you want, it's versatile)

Cut Pork into strips that will fit into meat grinder; arrange on wire rack.
Fill a large low tray -- a lasagna tray -- with Olive Oil and add to smoker.
Cold smoke Pork and Oil; we used apple wood pellets in an 18-inch stainless perforated tube, works well.
Flip the meat periodically to expose all sides.
This smoking runs a bit over 4 hours.
Chill Pork hard before grinding.
Grind through coarse plate, about 3 mm wholes.
Sear in a little of the now Smoked Olive Oil.
The Pork threw off 43g of fat, leaving 607g meat.
Reserve the fat for sauteing later.

Beans

225  g    8    oz  Dried Black Beans (Frijoles negros, secos)
  1  L   32 fl oz  Smoked Tomato Water

Cook beans in Tomato Water, covered, very low, until nearly tender, add water if needed; may take 1-4 hours.
Drain, reserve smokey bean liquid.
Makes 3 C cooked beans.

Chili Sauce Base

Build a base using Irene's Vegan Chili, sans chick peas, and substituting as many smoked ingredients as we can find -- smoked chipotles, smoked oil, smoked tomatoes, ... 

17 g   7 whole  Chipotle chilis, dried
15 g   3 whole  Sweet dried chilis (Costeño, New Mexico, Choricero)
52 g   3 whole  Fruity dried chilis (Ancho, Mulatto, Negro, Pasilla)
 1 L   1 quart  Smoked Tomato Water and smokbean-cooking liquid

Remove stems and seeds from Chilis.
Microwave chilis between two plates in 10 second increments until pliable and toasty smelling, about 30 seconds total.
Add Chilis to Smoked Tomato Water, cover, and microwave until it simmers, about 5 minutes.
Transfer to blender and blend until smooth -- be careful, the hot liquid can explode, so start with slow pulses and cover loosely with a paper towel.
Makes 4 Cups.

Assembly

 230g    1 large  Onion, diced
  ? g    3 clove  Garlic, minced
 10 g  1.5 Tbs    Cumin seed, toasted, ground
3.5 g             Fresh Oregano, or 2 tsp Dried, minced
 10 g    ?        Pimenton
400 g   14 oz     Tomatoes, preferably smoked, fine chopped
  ? g    3 whole  Chipotle chilis from a can, chopped
  ? g    1 Tbs    Chipotle can sauce
 95 g             Smoked dried Chipotle peppers, rehydrated
 20 g             Poblano Chilis from the garden, seeded, chopped
  ? g    1 tsp    Marmite or Vegemite (for Umami)
  ? g    1 Tbs    Soy Sauce (for Umami)

Saute Onions in rendered pork fat, then add Garlic, Cumin, Oregano; drain, reserving fat.
Add part of the drained fat to a large pot for final assembly, and fry chopped tomatoes in the fat. 
Add cooked Onion mixture and cooked Pork.
Add Pimenton, chopped Chipotles and their sauce (this was a 4 ounce jar's worth)
Add 2 C of the 4 C blended Chili sauce, since we had less meat than expected.
Let cook a bit to combine, then adjust salt.
Cook covered, low, until meat is tender, maybe another hour.
Add the 1 C of cooked Beans; this proportion seemed high at first but turned out fine.
Cook a bit more to finish, or let cool, refrigerate, then reheat the next day when the flavors will be married.

If the chili is too loose, or maybe has a bit too much fat, create a slurry of Masa in a little water and add it to the chili a tablespoon at of time until it's thickened as much as you want.

I like to serve this over spaghetti ("chili mac"), with grated Parmesan or Cheddar -- better, smoked Mexican cheese like Cojita -- and some diced onions or scallions. 

For the competition, use 1 C Black Beans; for home, use 3 C.

2021-08-31

Ruth Reichl's Pasta with Reduced Seafood Cream Sauce -- and Sea Urchins or Scallops


This is based on Ruth Reichl's "Michele's Pasta and Scallops" from her book "Comfort Me With Apples". Concentrating a flavorful fish stock -- then reducing it again with cream -- creates an intense, indulgent sauce. We've served this home made fettuccine and scallops, but the version pictured here is even better, topped with sea urchins and home made angel hair pasta that holds the sauce more gracefully. 

It's easy to make, just make sure you use good ingredients. We've been making it since 2003, it's a treat. Be warned that Sea Urchins are even more expensive than Scallops, a little flat will set you back about $14; they are quite perishable.  Makes a rich dinner for two.

2  cup  Fish Stock (use good stuff, not that junk in a box or can)
1  cup  Heavy Cream
1  flat  Sea Urchins ("tongues"), or 1/2 pound Sea Scallops
         Kosher Salt
1/2 Lb   Pasta, preferably home made angel hair
1  bunch Parsley, chopped fine for a garnish
1  Tbs   Lemon Juice, fresh, optional
1  Tbs   Toasted Bread Crumbs, wildly optional

Get pasta water boiling. Do the rest while it's heating.

Reduce Stock to 1/2 cup, about 5 minutes. I found a measuring cup to be helpful in judging this reduction and the next.

Add cream, simmer to reduce mixture to 2/3 cup, about 6 minutes. It's fine if the cream bubbles vigorously, it won't burn like milk would. It should start to take on a caramelized color and aroma. When sufficiently reduced, adjust Salt (don't salt earlier, the reduction will make it too intense), and keep warm on a very low flame.
Flat of Sea Urchins, home made Angel Hair pasta

Cook the pasta in salted water. If you use dried pasta you might want to start this step earlier; if using fresh, maybe a little later so it doesn't get ready before the scallops. Reserve 1/2 cup of the pasta water. Drain.

If you're using Sea Urchins, you don't need to cook them -- think sushi.

If you're using Scallops, dry them well, sprinkle generously with coarse Salt, and freshly ground Pepper (the black pepper flecks look good against the cooked scallops when served). 
Heat a heavy metal (dude) skillet; I use a cast iron. Film with oil. Grill scallops until just barely cooked, about 1-2 minutes per side. Transfer to plate, cover to keep warm.

Drain and plate the pasta.
Top with Cream Sauce; if it's gotten too thick, thin with a little of the reserved pasta water first.
Top with (uncooked) Sea Urchins, or seared Scallops.
Sea Urchins on intense sauce and pasta

Garnish with Parsley for a color contrast.
Squeeze a little Lemon Juice to brighten, if desired.
I think black pepper distracts from the color, but add if you like.
You can also top with toasted bread crumbs for a crunchy contrast, but that pushes this elegant dish to a more rustic direction.


2021-08-27

Farmers' Market Tomato Sauce, canned

Spring Valley Farm was selling a 25 pound box of tomatoes for $15, a bargain, especially since these ones were nearly blemish free. We made 10 Quart canning jars of sauce in a 1950's vintage pressure cooker I got long ago. This one is meat-free to give us the most flexibility later. Amounts are approximate and you can adjust the veggies and herbs.

25 pounds Tomatoes, fresh, trimmed of blemishes
 2        Onions, chopped
 2        Carrots, chopped
 2        Celery stalks, sliced
          Olive Oil
          Tomato Paste
          Red Wine
          Chili pepper flakes
 1   head Garlic, peeled, chopped 

 2        Bay Leaves, whole
          Parsley or its stems
          Basil, fresh

Freeze the tomatoes in a single layer, then remove. They develop a beautiful white frozen coating from the humidity.

To peel the skin, soak each tomato in a bowl of water a couple minutes, nick the skin with an X in the bottom, and it should easily peel and slip off; if it resists, give it another minute in the bath to thaw the skin.

Peeled and still quite firm

It's convenient to cut them while they're still a bit firm from the freezer, I cut them in 8 pieces each.

Saute the Onions, Carrots, Celery, Garlic in a generous glug of Oil until soft in a pot large enough to hold everything; we split ours between an 8 and 10 quart stock pot.

Add the Tomatoes, Tomato Paste, a healthy dose Wine, veggies, and herbs, then bring to a strong simmer.
Continue cooking until it's a little thickened.

Blend smooth so you don't have to worry about fishing out the herbs (our VitaPrep does a good job), then strain through a course sieve to remove the seeds.
Return to heat, bring to simmer, cook a bit more if it needs thickening, and finally adjust the Salt.

Fill 10 quart canning jars, add lids and seal. (did you know the Ball Aerospace Company is the same company that made Ball Jars?).
Add 2 quarts water to the pressure cooker, add the bottom rack, then the sealed jars.
Pressure cook at 5 PSI for 10 minutes (per the Mirro Matic instruction booklet), and let cool naturally. I had to run two batches in my 12 quart vessel.


Crispy Pig Ears: 2-ways

At a heritage pig break-down demo we went to, the butchers handed out the cuts at the end: we got the pig ears -- it's not like we had to fight off the others to get them! We've had pig ears once before, at Eola in DC, cooked by adventurous chef Daniel Singhofen. I wanted something crunchy, and found two preparations, so we tried both. All the recipes I saw boiled the ears for 2-3 hours, then finished them to crisp them up.  Serious Eats had a simple finish of searing on a hot grill. Rather than boil, which I thought would leech too much flavor, I cooked them sous vide, as suggested in a Great British Chefs article I found when searching for sous vide.

They both turned out quite well, without a lot of fuss, The seared ear was like a giant Chicharrón, one of my guilty pleasures. The fried slices were like an awesome bar snack.  Both are super rich, the 8 ounce total weight was enough for two of us for dinner.  Irene made a caper and cornichon salsa, but a zingy chimichurri would go well, too.

2 Pig Ears (225 g, 8 ounces)
Kosher Salt
Lard, frozen hard
Flour
Corn Starch
Cayenne Pepper powder
Oil for Frying

Singe the Ears to burn off any hairs; ours were scrupulously clean so this wasn't really necessary.
Put the ears in a zippy bag with about 25g Salt, a splash of water, shake to distirute, and chill 6 hours.
Remoe the ears, rinse and dry.
Place each ear in its own sous vide bag, add a pat of frozen Lard, seal, and cook 24 hours at 85C/185F.
Remove the Ears, press flat and weight down, then cool overnight.

Remove the Ears.
Heat Oil for frying to 190C/375F.
Heat two cast iron pans over high heat.
Mix Flour, Cornstarch, Cayenne in a baggie.

Place one Ear on a pan, and cover with the other pan to sear both sides. 
Cook a few minutes until it starts getting bubbly and crusty, flip the ear, cover, and cook another couple minutes. 

Cut the other Ear into thin strips.
Add the strips to the Flour mixture, shake well, then remove and shake off excess dusting.


Boil in Oil for about 3 minutes until crunchy, drain.

Serve with an assertive acidic sauce or salsa.


2021-07-10

Jerk Pork from Fine Cooking

 This recipe came from Fine Cooking, June/July 1994 (text at Internet Archive).

Jerk: the process

Jerking is a two-step process. First you marinate the meat for at least four hours; overnight is better. Then you slow-cook it, preferably over hardwood coals, be- cause the sweet hardwood smoke contributes half the flavor of the finished jerk. Here in Texas, I use pecan, apple, or my favorite, peach. Maple, walnut, almond, or hickory would be fine, too.

The traditional Jamaican way is to dig a pit about two feet deep and set stones or cinder blocks at each end to support the green sticks of the grill frame- work about eight inches above the coals. The fire is started and when the coals are ready, the sticks are set in place, and the meat is put on the barbecue. Banana leaves used to be placed on top to help trap the smoky heat; nowadays it’s more likely to be a sheet of galvanized zinc. The meats are “jerked,” or turned, every 15 to 20 minutes. Pork takes two to four hours and chicken 45 minutes to two hours, de- pending on the fire. The slower and longer the cooking process, the better the finished jerk.

To make jerk pork at home, I marinate the meat and refrigerate it overnight. I use a lot of jerk in pro- portion to the amount of meat, normally two to three cups of jerk rub for a 6-pound pork butt roast. I prepare the pork butt by removing the bone (you can have the butcher do this). Then I place it skin-side down on the cutting board and cut it at 11⁄2-inch intervals straight down to, but not through, the bottom layer of fat next to the skin. I rotate the roast 90° and again cut at 11⁄2-inch intervals. This makes a lot of stubby, square fingers of meat, all connected on one side by fat and skin. I rub the jerk deeply into these pieces of meat.

About an hour before I begin cooking the roast, I start a fire in my covered grill with mesquite. When the mesquite coals are ashen, I add peach or pecan wood (I do this because there’s always more mes- quite available than fruitwood). I put a drip pan directly under the meat to prevent scorching. I often pour half a bottle of Jamaican Red Stripe beer into the drip pan (I drink the other half). I set the pork on the grill rack 6 to 8 inches from the coals, cover it with a pot or lid, and “jerk” it every 15 to 20 minutes until the meat is tender, spicy, and succulent. By the time the pork is done, the pan’s contents are a great dipping sauce.
 

Jerk Rub

You’ll get a better texture if you chop the herbs and pep- pers by hand. A food processor or blender is a time-saver, but it tends to make an overly smooth purée. If you want to use a machine, be sure to pour in the half cup of oil first, and then add the herbs. The thyme and peppers should always be chopped by hand and added at the end. Be care- ful with the peppers, however. Their oils can really burn your eyes and skin, so be sure to wash your hands when you’re finished chopping. And don’t add the seeds unless you like a lot of heat.

If you grind the spices in a coffee mill or spice grinder, start with the nutmeg and cinnamon. Grind these until coarse, then add the other spices, and grind them all to- gether until fine. If you use preground spices, you might need to use more—up to double—depending on how long they’ve been sitting in your cupboard.

Jerk rub is best after a few hours, when its flavors have had a chance to meld. The rub keeps for up to three months in the refrigerator. I tend to jerk everything in sight for a week and then have to make more. Makes 3 cups.

30 scallions
5-in. piece fresh ginger, peeled
1 head fresh garlic cloves, peeled
6 bay leaves
6 to 8 Scotch bonnet peppers, seeded, chopped fine by hand (substitute habaneros if necessary)
2 tsp. freshly ground nutmeg, preferably Jamaican 

2 tsp. freshly ground cinnamon (about 1 stick)
1 Tbs. freshly ground allspice, preferably Jamaican 

2 Tbs. black peppercorns, ground fresh
2 Tbs. whole coriander seeds, ground fresh
1 Tbs. sea or kosher salt
1 cup fresh thyme leaves, chopped fine by hand
OPTIONAL:
1⁄2 cup oil (only if using a blender)
1 tsp. apricot jam or honey (only if using habaneros instead
of Scotch bonnets)

Chop the scallions, ginger, garlic, bay leaves, and peppers separately until moderately fine. Combine these ingredients and chop until fine. Put in a bowl and add the ground spices. Stir in the chopped thyme and mix well.

2024-12-29 Sous Vide then BBQ

We wanted to use sous vide because we were planning to serve this for a party and didn't want to fuss over a BBQ for hours.  We got two hunks, one from Bon Area and another from Cruz Morales in Mercat Ninot, and split them into 3 pieces, each 400-500g.  We made the rub with a food processor, leaving the Scallions in fairly large chunks; we used just 2 habañeros and some Italian chili sauce, and the heat turned out well.  We sliced and applied the rub, then bagged for sous vide, and let marinate overnight. 

The next day we cooked them for 4 hours at 80c (176f). We then finished on the BBQ to give it some crunch and color, and dried out the vegetables. We reduced the liquid from the bag to a spicy sauce and served over black eyed peas and rice, along with the crispy veggie rub. The meat was drier than I'd like, and wasn't hard to cut, but could have been more tender. The amount turned out about right for the two of us.

You can see some of the meat is a bit dry and grainy

Most of the recipes I found for "sous vide pork shoulder" used around 75c for up to 24h, but tended to focus on shreddable BBQ texture: Serious Eats 18-24h@74c, Savoring the Good 24h@63-74c, Anova 18-24h@63-74c, and Amazing Food has good qualitative descriptions for 18-48h@57-80c. I hadn't planned ahead for a long cook, since we frequently make pork tenderloin "puerco tonnato" with 2h@58c, which is why I chose the high 80c temperature -- clearly too high for my taste.

Next time, let's try 18-24h@70c, then maybe 18-24h@60c and see which we like best.


2021-06-17

Cicada's Knees bulk cocktail

This is a variation of the classic Bee's Knees cocktail that we made in bulk for a party as Brood X Cicadas started emerging. It was very well received, and we've made it a number of times this Cicada season. We use both lemon and lime, and steep the hulls in the Gin which adds a huge aroma to the drink. Start the day before to give it time to extract. It's proportioned to fit in a standard 750 ml (26 ounce) wine bottle for portability. 

16 oz Gin
 4 oz Lemon/Lime Juice, freshly squeezed (about 4), keep the skins
 4 oz Honey
 2 oz Water

Squeeze the Lemons and Limes to get 4 ounces of Juice.
Gently heat to dissolve the Honey in Water. 
Strain Juice into Honey Syrup and hold in fridge overnight in a 750 ml bottle.

In a mixing bowl, pour the Gin over the Lemon/Lime shells, and muddle to release oils from the skins;
cover to reduce evaporation and let sit overnight.
Remove each citrus husk and squeeze the retained Gin into the bowl.
Strain the Gin into the 750 ml bottle on top of the Honey/Citrus Syrup.
Shake to combine, chill.

Serve over ice.

2021-05-12

Goose Egg Cheese Soufflé

A friend has goose eggs in the spring, and a single one makes enough soufflé for two people. Plagiarized from Serious Eats which uses 4 hen yolks and 5 whites; the goose eggs have a much higher proportion of yolk to white than hen eggs, but this still cooked up tall and proud, and was very tasty. Our goose egg was 160g, about 3x the weight of a hen's egg, and this filled two individual ramekins plus a little one, so we use 2+1. 

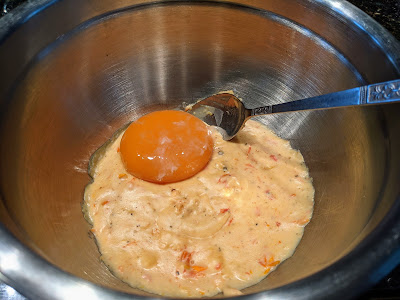
In the photos for this prep, I chopped grape tomatoes and cooked them in the bechamel butter to intensify their flavor before adding the Flour; their sweetness worked well with the Manchego cheese.

Soufflés just out of the oven

               Hard cheese (Parmigiano, Grana Padano), finely grated
 15 g   1 Tbs  Butter, softened to grease the ramekins

 45 g   3 Tbs  Unsalted Butter
 30 g   1 oz   Flour
235 ml  1 C    Whole Milk
               Kosher Salt
               Pepper
  1 pinch      Dry spicy chili like Arbol or Cayenne flakes

  1 whole      Goose Egg (160 g), cold
  2    1/2 t   Cream of tartar (optional; see note) 
 85 g    3 oz  Semi-firm cheese like Cheddar, Gruyère, Manchego

Grease the 3 ramekins with soft butter, then dust with finely grated hard cheese.
Hold chilled in fridge.

Melt butter then add Flour and cook to a paste, then drizzle in milk to make a bechamel.
Stir and cook until it bubbles then cook a few minutes more to thicken.
Scoop into large mixing bowl to cool a while.

Separate Goose Egg into white and yolk.
Whip the Whites with the Cream of Tartar  in a very clean bowl with clean beaters until you have firm glossy peaks, takes a few minutes (I use a cheap 1970s electric hand beater).

Add the Yolk to the cooled Bechamel and combine with the beaters -- it's OK if white gets in yolk, but not the other way around.

Goose egg on tomato bechamel, that's actually a large spoon

Add 1/4 of the whites and stir well to loosen the mixture.
Add in the grated semi-firm cheese and stir to combine.
Add the remaining whipped Whites and gently fold to combine minimally.

Manchego, whipped whites, tomato bechamel with yolk, parmesan-dusted ramekins

Pour into chilled cheesy ramekins.

I did need the extra small ramekin (front)

Bake 30 minutes at 400F until browned on top.
Serve immediately, they fall quickly.

2021-05-26 Spinach

We replaced the cheese with 200 g cooked and well-drained, finely-chopped Spinach; it worked well.

2021-09-12 Free range chicken eggs

A friend is growing chickens in her backyard, beautiful birds producing delicious eggs. We used 2 eggs, each 60 g, and cut the rest of the ingredients by 2/3.  We baked them in two large ramekins instead of two plus a third small. This worked really well.

2021-04-20

Koji Bread #1

Our friend gave us some Koji and it's been languishing in the fridge for years. I finally made Shio Koji with it, then made bread from that -- it wouldn't be a costly if it didn't turn out. But it turned out beautifully, dark color, nice crust, a flavor with a slight sourdough-like edge.


Bread cooling on rack


Koji is rice inoculated with the Aspergillus oryzae (koji kin). It has a transformative power which is used to make Soy, Miso, and is now being used by chefs in some crazy non-traditional preparations.  I made Shio Koji with ours by adding an equal weight of water, and 5% of total weight in Salt; I whizzed it, and let it ride unrefrigerated for 10 days. After a while it developed an acetone smell that dissipated a bit with a daily stir. Disgusting? Dangerous? Lethal? How bad could it be? I tried a taste and the cream-like liquid had a flavor like creamy blue cheese without the blue. I figured if I made bread with it and it turned out badly, it wouldn't be too expensive a mistake. So I made it with my usual long-rise technique, and covered hot bake. 

1000 g All Purpose Flour
 400 g Koji
 450 g Water
  20 g Salt

Combine the ingredients in a stand mixer, then knead 10 minutes.
I started with 350 g Water and kept adding it until the texture seemed right.
Put in a covered 3L Cambro container and let rise in the fridge 3 days; it rose from 1L to 2L.
Take out, let warm up several hours, and rise to 3L.
Shape into a ball and let rise in a parchment lined bowl, covered with cling film.

Shaped and final rise

Preheat oven with a large cast iron pot and cover to 550F convection.
When hot, lift the bread on its parchment and lower into the screaming hot pot.
Cover, cook 20 minutes.
Drop temperature to 450F, cook 15 minutes.
Drop temperature to 350F, uncover, bake 30 more minutes.
Carefully remove from pot by grabbing the parchment, let cool on a rack before cutting.

 =

2021-04-06

Stuffed Squid in its own Ink

This is dramatically black, surprisingly rich, and not that difficult to make. Serve it over cooked white rice for good contrast.

Squid with ink sauce served over rice

The recipe is adapted from "¡Delicioso! The Regional Cooking of Spain" by Penelope Casas, "Cipirones Rellenos en su Tinta". I've streamlined it to avoid removing the squid from the sauce and overlap cooking and prep times. The squid we get, by Town Dock, frozen and available at BJs Wholesale, does not need the 2+ hours cooking time hers do; this should take about an hour total.  Makes two servings.


Stuffing

1 pound Squid, about 2-4 inches long, cleaned, defrosted; separate tentacles and tubes
1 Tbs Olive Oil
1 medium Onion, chopped very fine
2 cloves Garlic, minced
1.5 Tbs Parsley, minced
Salt
Pepper

I used a 3 Quart Pot, about 6-inches tall, but narrow enough that the sauce mostly cover the Stuffed Squid when it cooked later.
Finely chop the Squid tentacles and fins, saute in Olive Oil with Onion, Garlic, Parsley, Salt, and Pepper. 
Cook about 10 minutes.
Move it to a bowl and reuse the pot for the Sauce.

Sauce

1 tsp Squid Ink
1/8 C Dry Red Wine
1/8 C Fish stock, clam juice, liquid from defrosting the Squid, or Water
1 Tbs Olive Oil
1 medium Onion, chopped fine
2 clove Garlic, minced
4 ounces Bell Pepper, cored, seeded, finely chopped (we used an orange one)
4 ounces Tomato
Pepper, black

In a bowl, combine Ink, Wine, Fish Stock and set aside to dissolve a bit; the Ink is quite thick and wants to stick to itself and everything else.
Heat the Oil and saute Onions, Garlic, Peppers, Tomatoes, Parsley, Black Pepper for 5 minutes. Cover and cook slow for 15 minutes to break down the vegetables. 
Stir in the Ink/Wine mixture and any liquid from the defrosted Squid.

While the sauce cooks, stuff the squid.

Stuff the Squid

Load a wide-tipped pastry bag with the cooked stuffing; you can use a spoon but it's fidgety.
Stuff each of the Squid tubes, but don't over fill. 
Close each with toothpicks.

Combine, Cook

Whiz the Sauce with an immersion blender and pass through a fine sieve to strain out tomato skins, seeds, and leave a smooth sauce. Return to pan.
Add Stuffed Squid to the Sauce and cook until the squid is tender enough, ours took about 20 minutes.
If the sauce is thin, leave it uncovered or slightly covered; if thick, put a lid on it.
It should be like a thick gravy, not a loose liquid.
Taste the sauce and add Salt if needed, but be careful since the Ink is pretty salty.

While this is cooking, cook some Rice.

Serve

Add cooked Rice to warmed plates.
Remove the Squids one at a time, and remove the toothpicks; arrange squids on the rice.
Cover with the cooked Sauce.
Garnish with some minced Parsley for contrast.


2021-02-23

Baccalà alla Vicentina

Irene found the site of a "brotherhood" dedicated to one dish, based on dried cod. I love bacalao/baccalà so this was like catnip to me. Dried (or salted) cod is re-hydrated, dusted with flour and parmesan, cooked in milk with oil, onions, and anchovies for quite a long time. It looks rich, and is served with polenta.


There's a recipe ("an edible mummy?") and helpful video; this alternate edit of the video provides more detail. The chef is using whole sides of dried fish, dusting the insides which he first bashes to tenderize on a log.  We can easily find smaller portions of "salt cod" rather than the air dried "stockfish", and both are frequently used in this dish. We'll use a more simple technique of layering, taken from another recipe, since our fish portions and dinner size is smaller. 

For two:

150 g      Onion (1 medium), chopped medium
120 ml     Olive Oil, enough to cover Onions generously
  4 clove  Garlic, sliced
 22 g      Sardines/Anchovies, chopped fine, desalinated if dried

350 g      Baccalà, desalinated boneless filets (skinless)
dusting    Flour
 20 g      Parmesan Cheese, fine grate
sprig      Parsley, fine chop
           Salt
           Pepper
450 ml     Whole Milk, hot (probably a bit much)
glug       Olive Oil

Cook the Onions, Garlic, Sardines/Anchovies until the onions are softened but not browned.


While that's cooking, you can preheat the oven (120C/250F) and prep the fish.


Dust the Bacalà with the Parmesan, Flour, Parsley, Salt, and Pepper.
Layer into the baking dish that has the cooked Onions.
Cover with Milk, and add a glug of Olive Oil on top.


Cover and cook very low, 120C/250F for 3 hours, without stirring;
the fish will probably break apart but we don't want a mush.

Serve with polenta, we like ours firm-set then grilled to brown a bit.

2021-02-20

Cacio e Pepe with a stick blender

I like Cacio e Pepe because of it's minimalism: pecorino cheese and black pepper. But it can be difficult to make, requiring careful temperature control to prevent it from seizing. This technique uses a stick blender to begin the emulsion, which I believe stabilizes the cheese and makes it easier to turn into a simple sauce. It's quick and easy to make; check the YouTube video to see the paste-like texture you're aiming form.

Cacio e Pepe served with cooked radicchio 

The following proportions were generous for two as a main course, served with a tasty salad. The pepper is quite assertive, but it's supposed to be. 

225 g     8 oz    Spaghetti, uncooked
100 g   3.5 oz    Pecorino Romano cheese, grated very fine
  5 g     1 Tbs?  Black Pepper, coarse grind
 90 ml  3/8 C     Cold Water (approx, adjust as you go)

Cook the Spaghetti in just enough boiling salted water to cover it (we want to use the starch which will be in the water to help emulsify the sauce).
In the 10 minutes or so it takes to cook, prepare the sauce.
Blend the Cheese and Pepper in a tall vessel with a stick blender, adding about half the water, then gradually more until you get a paste-like consistency; avoid letting it get to the thinness of a batter.
Transfer the cooked Spaghetti to a warm bowl, it's fine if there's water clinging to the pasta.
Add the sauce paste and stir well, it's probably too thick to become a sauce.
Add a little hot starchy cooking water to the bowl and stir vigorously to coat the pasta; add more water if it seems too thick. 
Serve with a bit more grated Pecorino as a garnish.

Next time...

I like to minimize prep bowls: if I blended in a bowl, I could reuse it to combine the sauce and spaghetti; this might require a larger batch to have enough substance for the stick blender.

Make a double (or larger) batch of the paste and freeze portions in tubs or ice cube trays; thaw, then add to cooked pasta with hot water to serve.

The blended pepper made the sauce a little gray: try blending the cheese with the cold water, then stirring in the ground pepper into the paste.


2021-02-17

Passion Fruit Crémeux

The flavor of Passion Fruit (Maracuya) is intense, and this makes for a zingy dessert. 


The pulp is easy to find in the frozen section of Latin markets. The first we tried was too firm to eat in this presentation. The second (originally mango) is more intense but still a bit firm so we’re cutting back on the Gelatin from 14g to 7g. This makes enough for 4 desserts, topped with the mascarpone.

7 g 1 envelope Knox Gelatin
270 g 9-10 fl oz Passion Fruit Pulp
100 g 2 whole Eggs
90 g 1/2 C Sugar
30 g 2 Tbs Butter


Bloom gelatin in a little of the cool melted Passion Fruit Pulp juice

Heat Passion Fruit Pulp to 190F/90C

Beat 2 eggs with Sugar, add to pan, heat whisking to 190F/90C until thickened

Remove from heat, cool to 180F/82C, add bloomed Gelatin, whisk or stick blend

Add frozen Butter chunks, stir to melt

Mix with stick blender

Pour into mold (Sundae dishes, martini glass, etc), tap to release air bubbles

Chill to set


Irene thinks we should drop the gelatin even more. Maybe what she really wants is a maracuya mousse. Chris thinks it'd be fancy to have a layered dessert with both, especially if it can be unmoulded.