2015-05-23

Saffron Ice Cream

In 1993, Steve Pope mentioned this on USENET group rec.food.cooking and it sounded interesting. We modified the basic French Vanilla ice cream recipe that came with our cheap ice cream maker, leaving out the vanilla so the saffron comes through. The amounts here just fit our maker. It’s made by Deni and cost about $40, and the same model Cuisinart sells for about twice that: it’s a metal bowl you chill in the freezer, and put it on a motor base that spins it under a lid that has a dasher paddle. Now that we live in Barcelona, we had to buy another machine because I missed this so much -- we have plenty of good ice cream here, but not saffron; it's a Duronic IM540 for 43€, with a top-mounted motor, which like the others, makes the pouring chute rather small for loading.


We had saffron from Whole Foods -- overpriced, poorly packaged, but reasonably tasty.  Next time we used the Spanish saffron we got from Penzey's. We haven’t yet tried very well priced stuff from saffron.com. In Barcelona, we can easily buy good quality saffron, even in our grocery store.

I like to serve this drizzled with a thin thread of ancient honey we have had lurking in our pantry -- it’s dark and intensely flavored and for some reason really complements the saffron. Of course you have to age the honey for a decade or two first :-)

0.2 g 1/8 tsp Saffron threads
15 ml 1 Tbs Brandy or Rum

3 3 Eggs
350 ml 1 1/2 Cup Whole Milk
475 ml 2 Cup Cream (heavy whipping cream, 36% fat)
200 g 1 Cup Sugar
1 pinch 1 pinch Salt


On 2024-10-15 in Barcelona, I only had 400 ml cream so scaled down 85%, maintaining the Eggs and Saffron; it was a good volume for the size of my ice cream maker. The finished ice cream was a good texture:

300 ml Milk
400 ml Cream
170 g Sugar

Crush and infuse Saffron threads in Brandy/Rum for 30 minutes or longer. A trick I learned from a Spanish chef on YouTube is to fold a piece of paper and crush the Saffron inside with the back of a spoon or similar -- it produces a fine powder.


Whisk Eggs, Milk and Cream together in large saucepan, over double boiler if you're worried about curdling.
Add Sugar and Salt and cook over low heat (double boiler) at 78-80C / 170-175F stirring constantly until thickened and a custard is formed, about 15 minutes; close to the final temperature it will start to thicken quickly so be careful.
The mixture should coat the back of a spoon.
Cool, then add Saffron Brandy mixture; the mixture must be cool before adding any alcohol like Vanilla extract or Saffron Brandy, or it may explode. Mix well.

This original amounts should make 4 1/2 C mixture, the max our ice cream maker can handle. The reduced amount above seemed about right, making 900 ml chilled mix, and not overflowing our Duronic ice cream maker.
Sorry about the bands in the photo below, a weird interaction between the camera and LED lights strobing.


Churn in ice cream maker per its instructions, transfer into containers and cover snugly with film to prevent ice crystals, then freeze overnight to set.

Film pressed against the ice cream. Again with the strobe-bands :-(


Bacalao Stuffed Piquillos in Basque Sauce

Original recipe: from Teresa Barrenechea: The Basque Table -- “Pimientos del Piquillo Rellenos de Bacalao con Salsa Viscaina”
Serves: 4

This is roasted Spanish red peppers stuffed with a salt cod bechamel, baked in a sauce of chilis and onions. It’s rich, complex, and feels like a combination of rustic and something you’d find at a fine restaurant.

I’ve made this a bunch of times and it’s been surprisingly popular, even with folks that I thought might be scared off by Bacalao (dried salt cod).  The original recipe takes a while but it’s not really hard. Recently, I’ve streamlined it significantly by using a food processor rather than meticulously cutting the fish and chilis, and eliminated the need for a food mill.

Bacalao has a taste that’s different from fresh cod -- earthy, perhaps even a bit funky. I used to only be able to find it in Portuguese markets but now even BJ’s wholesale and my local grocery store carry it. Look for ones without bones (sin espinas) or skin, it’s worth the extra money. We get the Piquillo peppers from our Harris Teeter grocery store: they’re in a can and, surprisingly, are the store brand. The can holds about 20 peppers which is just right for this recipe. For the sauce, the original recipe calls for Choricero chili peppers but these are very difficult to find, I’ve only had them from tienda.com. I use a flavorful fruity but mild Mexican chili like ancho, pasilla or poblano -- good rich taste and readily available.

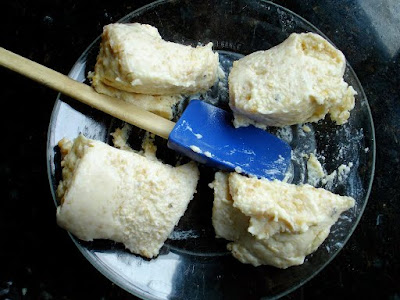
Dividing the bacalao bechamel for stuffing
Dividing the dough for spooning
Stuffing the pequillo with firm bechamel
Spooning in dough; a pastry bag is much easier
 
IMG_2139.JPG
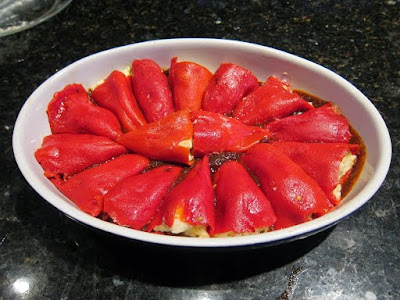
Stuffed peppers arranged on a layer of sauce
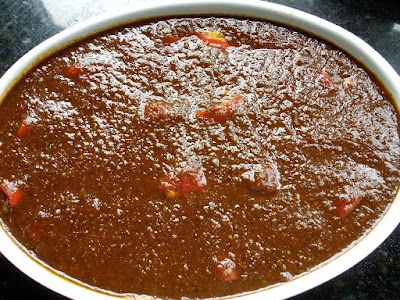
The assembled, sauced dish ready for baking
Cover with sauce then bake

Bacalao-stuffed Pequillos


225 g 1/2 pound Bacalao (boned and skinned dried salt cod)
50 ml 3 Tbs Olive Oil
25 g 3 Tbs Flour
350 ml 1.5 Cup Milk, heated
20 Piquillo Peppers (approx, from 1 can)

Rehydrate the Bacalao 1-2 days, changing the water several times a day. It will never be as soft as fresh but it should be flexible rather than firm; consider saving some of the last soaking water to loosen the sauce.
Whiz it in a food processor until roughly the texture of cooked ground beef, not a mush.
In a non-stick pan, saute Bacalao in Oil until lightly browned,
add Flour and cook another 15-20 minutes.
Slowly add the heated Milk while stirring and cook until resulting bechamel is smooth and thickens.
Cool so it firms up: it’s easier to fill the Piquillos if it’s almost a dough than a gravy.
It's easiest to stuff these with a Pastry Bag: fill the bag, then squirt into each pequillo "sock";
if you don't have that, it helps to divide the dough into 4 lumps, then divide each lump between 1/4th of the peppers -- that way each is filled evenly and you won't run out; fill each pepper by spooning in filling.

Basque Sauce


While the bechamel is cooling, make the sauce. I’ve cut back on the oil a fair amount from the original recipe as I found it too oily; this still has plenty of richness.

45 g 1.25 oz Dried Choricero, Poblano, Ancho Chili (rich, not spicy)
2 medium Yellow Onion, quartered
1 medium Red Onion, quartered
80 ml 1/3 C Olive Oil
1 clove Garlic
2 T Serrano Ham or Prosciutto (I usually omit)
1 Plum Tomato
to taste Salt

Slit Chilis and shake out seeds.
Rehydrate Chilis in cold water at least 8 hours; drain, reserving 1 Cup liquid.
Scrape out remaining seeds gently so you don’t lose the flesh.
Whiz Onions in food processor until a chopped fine, maybe ¼ inch chunks.
Saute Onions in Oil until softened.
Whiz the Chilis, Garlic, Ham, Tomato and cooked Onions in a food processor until smooth.
Add back to pan and cook about 20-30 minutes until everything’s soft and sauce reduced a bit, perhaps not as thick as ketchup; add reserved hydrating Liquid if it gets too tight or you want to boost the flavor.

Assembly


Spoon a little of the sauce on the bottom of a casserole or baking dish.
Arrange stuffed Pequillos in the dish; handle them gently so the sauce doesn’t ooze out too much.
Remember the arrangement so it’s easier to remove them gracefully at service.
Add the rest of the sauce, it should cover the Pequillos.
Bake at 350F about 30 minutes until hot and bubbly and a bit browned on the top.
Let cool a bit and firm up before serving.


2015-05-21

No Knead, Long Fermented Bread


Mark Bittman popularized the technique Steve Lahey created for “no knead” bread. I was skeptical: my first attempt left hunks of raw flour, and it’s not that hard for me to let a KitchenAid knead my bread for 10 minutes. But I tried again later, ensuring I had enough water for the high-hydration Lahey says is needed, and it worked well. In fact, I find it works better than kneaded bread I usually make: the crumb has a more golden yellow color than dough that’s oxidized due to kneading, I think it has more flavor, and it rises as well as any of my others.
The theory is that gluten development doesn’t really require physical kneading -- it will develop by itself given time and enough hydration (water to flour ratio). So while conventionally made breads may be 65% hydration, this is around 80%. It makes it easy to mix, but tricky to form for beginners.
I’ve combined the no knead approach with my usual long slow fermentation.  I use little yeast and an extended fermentation (rise) time, slowing it down as much as possible to increase flavor by fermenting in the fridge. You really can taste a difference between short conventional same-day ferments and 2 or 3 days.  I ferment in 2 Liter Rubbermaid tubs and cheat a bit on the lift, stretch, fold, flip that Lahey does.

As with my yes-knead bread, I make batard (fatter than baguette) and boule (round) shapes with different baking techniques, discussed below.

I use the “baker's percentage” to easily scale recipes. The idea is that your amount of flour always counts for 100%, and other ingredients are relative to that. So 1000 grams flour and 800 grams water means the water is 80%, you have 80% hydration. I use metric to make measurements easy and find my KitchenAid can handle 1 Kg, which I frequently use to “mix” (not “knead”) the ingredients when I’m doing a lot of baking in a day.

1000 g Flour (I use King Arthur all purpose unbleached)
 20 g Salt (I use Kosher, not iodized table salt)
2.5 g Yeast (about 1 tsp)
800 g Water

Combine the dry ingredients well.
Add the water and use a stiff spatula or stand mixer dough hook to combine well;
try not to leave unmixed flour.
Shape into a rough ball -- it’ll be sticky -- and drop into a 2 Liter plastic tub or mixing bowl;
Cover and rise in the fridge for 2-3 days.
It should rise to the top, creating 2 Liters of dough.

The day you bake, take the dough out about 5 hours before you plan to bake.
Redistribute the dough by pulling it up from the bottom and folding over the top; I use a stiff spatula to pull up around the edges then try to roll it over.
Let it rise covered until it again doubles in size, or nearly so, and warms up, maybe 4 hours depending on your kitchen’s temperature.

A double batch gives 4 large, forearm-sized batards

If you’re making batards, cut the dough in half, then for each, roll it out flat by hand,

fold over like a letter, then turn perpendicular and roll it up like a jelly roll tightly.
You want to stretch the outer surface over the core.
Seal the seam with your fingertips and place into cloth-lined wicker baskets or just cloth on the counter with cloth separating each batard roll.
Let them rise until when you press with a finger it doesn’t immediately fill back in (under-risen), but don’t wait so long that it struggles to fill back in (over-risen).
Before it’s finished rising, preheat your oven as high as it will go -- I do 550F plus convection.
If you have a baking stone (cheap quarry tiles work too) preheat it too;
if not, you can just use a cookie sheet.
When the dough’s risen and the oven and stone are bitchin’,
carefully roll the dough out of their baskets or cloth onto the stone or sheet.
Slash the top with a razor or sharp knife, and close the oven door.
Bake for about 30 minutes until the outside is deeply golden, I prefer a dark brown myself as it gives a nutty taste.
Remove to cooling racks to provide ventilation and let cool before cutting;
listen for the cracking sound as it cools :-)


If you’re making boules, you can get a great result by baking in a “cloche”, a hot covered container: it keeps the humidity up so the bread can rise before the crust hardens. I use a large Le Creuset casserole, a Rumertopf clay pot (soaked in water before hand), or a Tagine. If you don’t have one, you can do it free-form on a cookie sheet.


At a friend's house, I didn't have a scale nor stand mixer, so I did a half-sized batch for a boule, and used a food processor to knead the dough about 30 seconds, and used a Tagine as a cloche, and baked at 450F for 30 then 20 minutes:


4 C AP Flour
2 tsp Kosher Salt
1 tsp Yeast
1 3/4 C Cold Water

A small-batch boule done in a friend's kitchen between cocktails: total active time was 15 minutes

Shape the entire dough into a ball and stretch the top outside down and over the sides towards the bottom, creating a taut surface; pinch the bottom closed.
Let rise on parchment covered lightly with a floured cloth.
Rise until a finger-poke doesn’t spring back but not so long it remains a void.
Preheat the pot and lid in a 500F oven while the boule finishes rising.
Carefully remove the pot out of the oven, remove the lid and and gently drop the loaf in the pot by holding the edges of the parchment.
Put on the lid and return to the oven for 30 minutes.
Remove the lid, turn down the heat to 450F and finish baking for 15-30 minutes
until the center’s fully cooked through and the color is deep golden.
Remove bread and cool on racks to allow ventilation, listening to the cracking sound, before cutting.

I get the most control using the oven in my kitchen, but usually throw a few loaves into our outdoor pizza oven after everyone's finished making pizzas. Let it cool down from pizza-friendly 900F to bread-friendly 450F-500F, else you'll incinerate your bread (been there, done that). I put a little door in the opening to keep the heat inside and even, and rotate the bread part way through the baking process. It's a great way of getting the more use of the heat of the oven.


2015-05-20

Thai Herbal Sausage from Pok Pok Cookbook

Northern Style Herbal Sausage
Sai Ua Samun Phrai
From Pok Pok Cookbook


We've made this a few times and really enjoy it. It's redolent of galangal, turmeric, lemon grass, and cilantro -- very appealing. The flecks of color under the skin give it visual appeal.

I first made this "by the book", including all the pounding (pok pok) with a mortar and pestle. As he says, it "is a royal pain". I'm now using a food processor, putting in the most woody items first (galangal, turmeric) then adding the others from most dense to most fragile; it turns out quite well. I've recently started using frozen chopped lemon grass instead of peeling my own, and find it quite acceptable; it's available in the Korean and Chinese supermarkets near me. I'm also dry-frying the aromatics rather than trying to grill over open flame, which I found fidgety.

The process of grinding and stuffing the sausage is standard, I tend to mix in the paste and aromatics with the meat as it goes through the grinder so I don't have to mush them into the ground meat afterwards. Our KitchenAid mixer's grinder attachment doesn't have the 1/2-inch holes the book requests, so we used the largest we had, and the resulting texture's fine.

Paste

60 g unpeeled Garlic
45 g unpeeled Asian Shallots (I used regular shallots)
30 g Galangal, cut across grain into 0.5 cm slices
15 g Turmeric, cut across grain into 0.5 cm slices
15 g stemmed dried Mexican Puya Chiles, slit open and seeded
40 g thinly sliced lemon grass, tender parts only (or same weight frozen chopped)
18 g Cilantro roots (I used the stems)
2 g finely grated zest of Kafir Lime (I zested a regular Persian Lime)

Sausage

500 g boneless Pork Shoulder, cut into 4 cm chunks
500 g skinless Pork Belly, cut into 4 cm chunks
25 g coarsely chopped Cilantro (leaves and stems)
1/4 cup Thai Fish Sauce
4 g very thinly sliced fresh or frozen Kaffir Lime Leaves (thick stems removed)
1.5 g mild Indian Curry Powder
2 g ground Black Pepper
2 m natural Sausage Casing, about 2.5 cm diameter, defrosted, washed well

Make the Paste

Dry-fry the Garlic, Shallots, Galangal and Turmeric, turning until Galangal and Turmeric are cooked through and look dry on both sides (don't let them char), about 5 minutes, and until the Garlic and Shallots' skin is charred in spots and they are fully soft but retain their shape, 15-20 minutes. Transfer to a plate to cool.

Grind the Chilis in a spice grinder.  In a food processor, process ingredients, starting with the most woody to the most delicate: Galangal, Turmeric, then add Lemon Grass, Garlic, Shallots, Cilantro, then Chili powder and Lime Zest. Process until it's a paste, but it will be a little fibrous and shaggy.  You should have a bit more than 1/2 cup.

Make the Sausage

Rinse casings well.

Chill the meats in the freezer for 30 minutes or so until it's firm so it'll grind cleanly rather then smearing. Grind the meats with a 1/2-inch plate or your largest one, alternating Shoulder with fatty Belly. I push in the paste and aromatics (Cilantro, Kaffir Lime Leaves, Curry Powder, Pepper) as I feed the meat, but you could combine once the meat's ground. Add the Fish Sauce and any remaining aromatics to the ground mixture and combine gently to mix without smearing.

Chill the meat mixture again while you load the casing onto the sausage grinder stuffer horn. Stuff the casings, letting the filled sausage curl into an attractive spiral.  Poke holes in the casing every few inches or where there are air bubbles. Let sausage sit in fridge a few hours or over night. We freeze it in vacuum bags at this point so we can cook it whenever we like.

Defrost the sausage and steam 6-10 minutes or sous vide at 60C/140F for 20 minutes until firm and springy but not fully cooked. Grill over charcoal, carefully turning over once, until cooked through, with light brown and dark brown patches. Let it cool to room temperature for serving.

2014-04-27

Rye Crispbread


As a starter for an upcoming Scandinavian dinner we're hosting, I wanted light starters. I'm a fan of the Knäckebröd I first encountered at Ikea and wondered if I could make it at home. We tried a couple recipes -- the first with yoghurt was a bit flat, the second alarmed me as it lacked yeast -- and liked the latter. While it didn't have the lofty layers of those Ikea disks, they were really tasty, crunchy, earthy and honest.  We devoured them all over a couple days.

Sadly, I've lost that recipe (cue song "MacArthur Park") so will have to re-create it.

Nigel Slater's recipe looks the most straight-forward so let's start there. I found a variation on his using sourdough that had appetizing image but I'll just use my standard direct yeast method here. I have a few more under References below if I want to tweak this one.

Makes 2 residential sized half-sheet pans when rolled about 2mm thick
  • 400 g rye flour 
  • 4 g fine sea salt 
  • 10 g dry yeast 
  • 350 ml water, room temperature

Combine the ingredients in a stand mixer and knead a bit with a dough hook; you can mix and need it hand, too. Rye's not got much in the way of gluten so you're looking to combine rather than develop white-bread style structure.

Cover and let rise in a warm place for an hour; it'll rise a bit but not nearly as much as a conventional bread dough, just a little puffed.

I chose to make rectangles out of these and got OCD about the shapes. Set a Silpat or parchment on the counter that will fit your baking sheet. Set two straight-edges on either side: their depth will determine the thickness of the crispbread (I used two L-shaped carpenter's squares about 2mm in thickness). Place the dough on the Silpat and cover with cling film. Roll out evenly, moving excessive dough to voids, and saving truly extra dough for another sheet. If you like, you can add coarse salt, caraway, sesame or other seeds and roll gently one final time to press them in.


Rolling to thickness with rulers as guides
Scoring with fluted pastry cutter

Use a fluted pastry cutter (or pizza wheel) to cut the dough into rectangles, but don't separate. Into each, dock (poke holes) with a skewer, nail or whatnot. I got crazy and built a little wooden block with small nails in the pattern of my initials, mirror-image reversed: the nail heads imprint each rectangle with my initials in the correct orientation; it makes for fast work too. If the dough is too wet and sticky, dust with some rye flour -- spreading it very thinly with a soft pastry brush.

The branding stamp, letters mirror-imaged

Docking the dough with the stamp
Transfer the Silpat and its dough to a baking sheet and bake at 200C/400F. Depending on thickness, it could take 15-30 minutes until crisp.

Let cool and store in an air-tight container.

I top these with home made gravadlax, smoked herring, and other good things. They're hard to resist just nibbling with no topping too; the rye's an enticing flavor.

2014-04-30 Lower hydration, give some rise

When I first made them, the dough was too wet: 350ml/400g gives 87% hydration: the cutter gummed up. The crackers were a bit thin and... crackery, rather than that Ikea-style half-cracker/half-bread.

So I made them again with 75% hydration. After rolling out the dough, scoring and stamping, I let it rise about 30 minutes to give some lift and texture. It helped: the dough didn't stick when scored and stamped, and the crackers had a bit more texure. Next time I'll let it rise even longer.

2014-05-02 Mixed flours, low hydration, more rise

The rye flour I'm using right now is quite coarse, so I'm mising 300 g Rye with 100 g King Arthur AP flour, again 75% hydration (300g water); first rise of 90 minutes, then 45-60 minutes after rolling, scoring and cutting.

References

QuetzalGirl's Rye Crispbead

This one uses butter and no yeast.
http://recipes.sparkpeople.com/recipe-detail.asp?recipe=95976

2 c. dark rye flour
2 Tbsp. butter 
1/2 tsp. salt 
3 oz. (6 Tbsp.) water

Rub the butter in to the flour and stir in salt. Stir in the water and mix to a firm dough. Divide dough in to two halves. Knead each half lightly on a floured surface. Roll each half out thinly in to about a 9" square. Cut into 3" squares and put on lightly greased baking sheet. Prick each square well. Bake at 390 for 10 to 15 minutes or until edges just begin to color, but do not let them brown. Cool slightly on the baking sheet then transfer to wire racks. 


SWEDISH CRISP BREAD FROM LOTTA JANSDOTTER

This one has yeast and a mix of flours

http://www.sweetpaulmag.com/food/swedish-crisp-bread-from-lotta-jansdotter

1 package dry yeast
2 cups lukewarm water
1/2 tablespoon salt
1 tablespoon fennel, crushed or 1 tablespoon anise seed
3 1/2 cups coarse rye flour
1 1/2-2 cups wheat flour

RYE CRISPBREAD RECIPE

No yeast!

http://www.painlesscooking.com/cracker-recipes.html

1 ¾ Cups rye flour
1 ½ Cups whole wheat flour
½ Teaspoon salt
½ Teaspoon finely ground caraway
2 Pinches freshly ground fennel
½ Cup warm water
3 Tablespoons warm buttermilk
3 Tablespoons sunflower oil
Oil for brushing

Bread and Milk and Blackberries

http://www.breadandmilkandblackberries.com/2011/12/swedish-rye-crisp-bread-with-caraway.html

This was one I looked at, it mentioned a special rolling pin but I improvised. It's now blocked and I can't find a cache, but other references to it mention an overnight rest, which I don't recall doing, so maybe it's not "the one":

Bacalao Espuma


Scandinavia produces a lot of salt cod -- Tørfisk, Klippfisk, Clipfish. They can dry it in the cold air without worrying about spoilage. I first had it in Spain, as Bacalao, and fell in love with the slightly funky flavor it contributes to dishes.

For a Scandinavian dinner, I wanted a stable warm foam, or "espuma", to top a birch-wrapped, sous vide cooked cod fillet. I wanted to double-down on the cod.

From previous attempts, I've found it hard to keep a foam stable at high temperatures: whipped cream preparations are typically served cold. My additions of Agar Agar and even Xanthan Gum (in small amounts) didn't help much. I was looking for something almost as thick and solid as whipped cream, or at least shaving foam.  Ferran Adriá refers to these warm temperature foams as Espumas so I will follow suit.

Here, I synthesize what I hope is a simple but stable Bacalao-flavored espuma. This is a condiment so I don't need a ton; I'm targetting a 1.0L iSi Thermo Whip so a maximum of about 0.5L product.

To top 6 filets

  • 250     g       Bacalo, bone- and skinless, rehydrated and desalted
  • 250     g       Potato, peeled
  • 250     ml      Heavy Cream


Rehydrate the Bacalao and soak in water for 2-3 days, changing the water 2-3 times a day to remove much of the preservative salt.  Cut it up fine so it will stay submerged in the Cream.

Simmer the Bacalao very low in Heavy Cream to infuse flavor, 30-60 minutes. You don't want it to bubble and reduce. (A sous vide bath might be helpful for this).  [I might need more Cream to Bacalao]

Meanwhile peel potato and cube, and boil 20 minutes until just cooked.  (Can I just cook the potato in the cream for 20 minutes?)

Thoroughly blend cooked potatoes and Bacalao cream, preferably in a Vitamix. While it whipped, it did NOT create a whipped cream: this was in retrospect a bit of a surprise; why not? Does this bode ill for the espuma?

Strain through coarse then very fine mesh seive. This gave me 400ml of bacalao-potato-cream.

Pour into iSi Thermomix. Check your volume, it should not be more than half full.  Charge with 2 N2O cream cylinders and shake vigorously. Hold in a water bath at a max of 75C (165F) until ready for service.


Resources

Below, I cite a number of recipes and resources from around the web. Some use additional flavors (shallots, coconut cream, chicken stock, cheese) but I wanted to let the Bacalao flavor dominate. The techniques I kept finding seemed to use heavy cream and potato: the fat from the cream will foam, and the starch in the potato may provide some stabilization.

iSi Potato Celeriac Foam (75C)

http://www.isi.com/en/culinary/for-professionals/recipes/recipes/recipe-of-the-month/?tx_isirecipes_recipes%5Brecipe%5D=1372&tx_isirecipes_recipes%5Baction%5D=show&tx_isirecipes_recipes%5Bcontroller%5D=Recipe

150 g Potatoes (floury)
75 ml heavy cream
75 ml Water
50 g Butter
75 g pureed celeriac
1 g Salt
1 g Pepper
1 g Nutmeg

Bring the cream and water to a boil in a pot and then, along with the boiled potatoes, blend into a fine puree. Add the pureed celeriac and the butter little by little then season to taste with salt, pepper and nutmeg. Pass through the iSi funnel & sieve directly into the 0.5 L iSi Whipper, screw on 1 iSi cream charger and shake vigorously. Keep the iSi Whipper warm at max. 75 °C in a bain-marie or in a water bath.


Espuma caliente de grasa de foie gras

http://vimeo.com/37517154
Xanthan 2.5g
Chick stock 300g
Whiz wiht immersion blenter very well
Add pepper, salt
Melt foie gras, add to Xanthan stock, whiz well
Striain, add to siphon
2 charges N2O
Hold at 70C

Potato Espuma

http://www.thestaffcanteen.com/recipe/potato-espuma/
600g cooked potatoes
450g hot double cream
150g hot milk
seasoning

Boil potatoes just until cooked, drain and slightly cool, peel and mash potatoes Add seasoning, add hot liquids and check seasoning adjust were needed, pass through double sieve, place into charger and use two charges and keep warm at 55oc

Pea Espuma (warm)

http://www.isi.com/en/culinary/for-professionals/recipes/recipes/vegetable-espumas/?tx_isirecipes_recipes%5Brecipe%5D=1104&tx_isirecipes_recipes%5Baction%5D=show&tx_isirecipes_recipes%5Bcontroller%5D=Recipe&cHash=635b0b38457dffc706c8fab2c5c212fc

200 ml heavy cream
100 g Peas
150 g Potatoes

Peel the Potatoes, cook until soft and mash with a potato masher. Blanch the Peas and puree in a blender until smooth. Heat the Heavy Cream, mix with the potatoes and the pea puree and season with salt, nutmeg and 50 ml mint oil. Pass through the iSi funnel & sieve directly into the 0.5 L iSi Whipper, screw on 1 iSi cream charger and shake vigorously. Keep the iSi Whipper warm at max. 75 °C · 165 °F in a bain-marie or in a water bath.


Potato foam 

250 g potatoes, peeled and cut into chunks
125 g single cream
30 g virgin olive oil, plus extra for drizzling

Place the potatoes in a pan of cold water, bring to the boil, and cook for about 20 minutes until soft. Drain, reserving 100 g of the cooking water. Place the cooked potato and the water in a blender. Purée, adding the cream little by little. Follow the same procedure with the oil until you have a smooth emulsion. Season with salt. Strain, then fill the siphon using a funnel.  Charge with nitrous oxide, shake, and keep warm in a bain-marie at 70 ºC.  Ferran Adria via http://www.chubbyhubby.net


elBulli Hot potato foam

http://www.foodsfromspain.com/icex/cda/controller/pageSGT/0,9459,35868_6908153_6910167_4459102,00.html
250 gr potatoes for mashing
100 gr potato cooking water
125 gr cream, 35% fat content
35 gr extra virgin olive oil
500 ml ISI siphon
2 N2O chargers
salt

Peel and cut the potatoes and place in cold, salted water. Bring to the boil and cook for approximately 20 minutes. When cooked, drain and reserve the water. Place the cooked potato and 100 g / 3 1/2 oz cooking water in the Thermomix at 60ºC / 140ºF. Blend and gradually pour in the cream. Do the same with the oil until a very thin, smooth emulsion is formed. Season with salt. Strain and fill the siphon using a funnel. Charge the siphon and place in a bain-marie at approx. 70ºC / 158ºF.


Cod Cooked Sous Vide in Birch Bark

Scandinavian Dinner


We're having a Scandinavian-themed dinner and I figured I channel my inner Redzepi for it. Each diner gets a portion of cod wrapped in the birch bark it was cooked in. It imparts a slight woodsy flavor and makes for great presentation. Because we're emphasizing the Birch, I'm omitting the (frozen) olive oil and lemon zest I'd normally use when cooking cod sous vide.

Brining the fish in a 10% salt water solution firms the fish and prevents oozing of ugly white proteins.

We expect about 4 ounce serving per person. Skin the fish first and portion it before cooking because it's too fragile after.

Look for birch bark sheets big enough to wrap your individual portions, but thin enough to be flexible. Carefully peel large birch bark sheets of the tree or find ones on the ground. Boil to soften and kill any nasties. Hold in the water to retain the flexibility until ready to use.

My setup is a Sous Vide Magic temperature controller driving a cheap hotplate with a large covered pot of water. Food is sealed in Tilia FoodSaver. This is pretty easy but you could do it normal stovetop pot with a careful eye on a thermometer in the water bath -- the time's short.

Recipe

Serves 6

  • 6       pieces  Birch Bark sheets, boiled
  • 24 oz Cod fillet, skinless (6 x 4 ounce portion)
  • 500 g Water
  • 50 g Kosher Salt

If the Cod has the skin, carefully remove and while prepping, heat in a nonstick skillet, weighted to keep flat, until crisp; use as a condiment on the finished dish.

Heat water with temperature controller to 132F/55C.

Make a 10% brine solution by dissolving the Salt in hot Water, let cool.  Add to ziptop bag along with Cod and brine 15 minutes.  Drain and pat fish and birch dry.  Cut into 6 serving pieces; it's too fragile when cooked.  Wrap each portion in a birch bark sheet, and place in a vacuum sealer bag.  Chill the fish in the bag well before sealing otherwise the liquid will get sucked out and ruin the seal.  Then vacuum seal the bag.


Seal and cook in the sous vide water bath at 132F/55C for 30 minutes; if your fillet is very thick, you could give it more time to ensure the heat penetrates evenly, 45 minutes should be enough but 60 shouldn't hurt..  Remove from bag and finish for presentation.

Plating for Service

For this Scandinavian theme, I plate the fish on the unwrapped birch to reveal the fish, then top with a bacalao espuma, garnish with bright orange, citrusy Sea Buckthorn Berries and add a few pearl-like bits of Salmon caviar.