2015-05-23

Lazy Bouillabaisse


This is a quick, weekday night take on the Mediterranean tomato-based fish stews. I started with Kate Rentschler’s Bouillabaisse from Cook’s Illustrated September 2001, then streamlined per Roberta Donna’s Zuppa di Pesce, memories of San Francisco Cioppino, and now improvise using the flavor profiles I’m looking for -- and tasting all the time. The texture’s thinner than a stew but thicker than a soup. The flavors I really enjoy here are saffron, orange, and anise.


We can tomatoes from the farmers market at the end of the season, but store-bought canned tomatoes are fine, too. You want the skins removed. All proportions are approximate, and use fish that’s fresh. You want some firm fish and some flakey fish for interesting texture; some shellfish is fine too.


Serves 2 as a main course, 4 as a starter

¼ tsp Saffron threads
3 Tbs Pernod, Absinthe or other anise liquor
¼ Cup Olive Oil
1 clove Garlic, minced
1 quart Tomatoes, skinned (we can our own, canned chopped are fine)
to taste Chili pepper flakes
to taste Salt
1 tsp Orange Zest (from about ½ an orange)
¼ pound Firm fish, cut into spoon-friendly chunks
¼ pound Flakey fish, cut into chunks


Crumble the Saffron threads into a cup with the Pernod and let flavors dissolve.
In skillet, cook Garlic until soft.
Add Tomatoes and their juice, and crush with a potato masher until chunky but small enough to eat gracefully from a spoon.
Bring it to a good boil, you want to emulsify the oil and tomato mixture to give it body.
Add Chili flakes and Salt.
Taste for body and add more oil if it feels thin and without luxury.
Turn down heat and add Orange Zest, Saffron and Pernod.
Cook gently to marry flavors and taste, adjusting seasonings and oil.
Add the fish, starting with the firmest, and simmer until just barely cooked.
Adjust seasonings once more.


Serve in pre-warmed bowls.
Extra credit if you top with a crouton and rouille.

Feijoada

Serves a lot of hungry people, you might want to cut this in half. Here, shown served with rice, collard greens, oranges and some vinegar-y hot sauce to balance the richness.


This is a rich meat and bean stew, the national dish of Brazil; you could compare it to French Cassoulet. We got this from our friends who were stationed in Rio in the 1970’s, they got it from their cook. It compares quite favorably to the ones I’ve had at Brazilian restaurants and churrascarias.  


We haven’t used the pig ears our original recipe calls for, and over the years we’ve been dialing down the meat a bit too. I’m guessing the meat-heavy proportions of the original were aimed at more affluent folks; it’s still plenty rich. I cook some of the beans long to dissolve into the sauce for body, and some less so they stay whole and provide texture. I expect there are as many styles of Feijoada as there are Chili con Carne in the States.


1 pound Black Beans, dried (or 4 pounds canned)
½ pound Fat Back (salty), cut into 6 pieces
2 large Onions, chopped coarse
5 cloves Garlic, sliced
3 Bay Leaves
½ pound Kielbasa, sliced into half-moons
1 pound Chuck Roast, boneless, cut into 8 pieces
1 pound Short Ribs (2-4 rib sections, on bone)
6 Cup Pork Stock (or Beef, or Water if you have to)


Soak dried Beans overnight, just covered in water.
Heat Fatback to render some fat.
Add Onions, Garlic, bay and saute until translucent; reserve to plate.
Season Chuck and Ribs with Salt and Pepper;
brown on all sides in rendered fat, don’t crowd the pan, use batches if needed,
then reserve to plate.
Drain off excess fat, reserving if you need it for body later.
Add half the rehydrated beans, the Stock, Onions, Garlic, and Bay and cook an hour or so until the beans are done -- time depends on how fresh the beans are.
Reserve half the beans.
Mash the beans in the liquid to thicken the sauce you’re developing.
Add back all the Meats; the stock should cover everything, if not, add more.
Simmer another hour or two until the meat is almost done;
I like the meat falling apart tender but not disintegrating.
Add the reserved cooked beans, adjust seasonings (including reserved fat if it seems a little lacking in rich body), and bring back to simmer.


Serve with rice, collard greens, slices of orange and a tangy sauce like Texas Petes or Franks. The citrus and vinegar cut the richness of the feijoada. Top with Farofa if you can find it (there’s even a bacon-flavored farofa :-).

Saffron Ice Cream

In 1993, Steve Pope mentioned this on USENET group rec.food.cooking and it sounded interesting. We modified the basic French Vanilla ice cream recipe that came with our cheap ice cream maker, leaving out the vanilla so the saffron comes through. The amounts here just fit our maker. It’s made by Deni and cost about $40, and the same model Cuisinart sells for about twice that: it’s a metal bowl you chill in the freezer, and put it on a motor base that spins it under a lid that has a dasher paddle. Now that we live in Barcelona, we had to buy another machine because I missed this so much -- we have plenty of good ice cream here, but not saffron; it's a Duronic IM540 for 43€, with a top-mounted motor, which like the others, makes the pouring chute rather small for loading.


We had saffron from Whole Foods -- overpriced, poorly packaged, but reasonably tasty.  Next time we used the Spanish saffron we got from Penzey's. We haven’t yet tried very well priced stuff from saffron.com. In Barcelona, we can easily buy good quality saffron, even in our grocery store.

I like to serve this drizzled with a thin thread of ancient honey we have had lurking in our pantry -- it’s dark and intensely flavored and for some reason really complements the saffron. Of course you have to age the honey for a decade or two first :-)

0.2 g 1/8 tsp Saffron threads
15 ml 1 Tbs Brandy or Rum

3 3 Eggs
350 ml 1 1/2 Cup Whole Milk
475 ml 2 Cup Cream (heavy whipping cream, 36% fat)
200 g 1 Cup Sugar
1 pinch 1 pinch Salt


On 2024-10-15 in Barcelona, I only had 400 ml cream so scaled down 85%, maintaining the Eggs and Saffron; it was a good volume for the size of my ice cream maker. The finished ice cream was a good texture:

300 ml Milk
400 ml Cream
170 g Sugar

Crush and infuse Saffron threads in Brandy/Rum for 30 minutes or longer. A trick I learned from a Spanish chef on YouTube is to fold a piece of paper and crush the Saffron inside with the back of a spoon or similar -- it produces a fine powder.


Whisk Eggs, Milk and Cream together in large saucepan, over double boiler if you're worried about curdling.
Add Sugar and Salt and cook over low heat (double boiler) at 78-80C / 170-175F stirring constantly until thickened and a custard is formed, about 15 minutes; close to the final temperature it will start to thicken quickly so be careful.
The mixture should coat the back of a spoon.
Cool, then add Saffron Brandy mixture; the mixture must be cool before adding any alcohol like Vanilla extract or Saffron Brandy, or it may explode. Mix well.

This original amounts should make 4 1/2 C mixture, the max our ice cream maker can handle. The reduced amount above seemed about right, making 900 ml chilled mix, and not overflowing our Duronic ice cream maker.
Sorry about the bands in the photo below, a weird interaction between the camera and LED lights strobing.


Churn in ice cream maker per its instructions, transfer into containers and cover snugly with film to prevent ice crystals, then freeze overnight to set.

Film pressed against the ice cream. Again with the strobe-bands :-(


Bacalao Stuffed Piquillos in Basque Sauce

Original recipe: from Teresa Barrenechea: The Basque Table -- “Pimientos del Piquillo Rellenos de Bacalao con Salsa Viscaina”
Serves: 4

This is roasted Spanish red peppers stuffed with a salt cod bechamel, baked in a sauce of chilis and onions. It’s rich, complex, and feels like a combination of rustic and something you’d find at a fine restaurant.

I’ve made this a bunch of times and it’s been surprisingly popular, even with folks that I thought might be scared off by Bacalao (dried salt cod).  The original recipe takes a while but it’s not really hard. Recently, I’ve streamlined it significantly by using a food processor rather than meticulously cutting the fish and chilis, and eliminated the need for a food mill.

Bacalao has a taste that’s different from fresh cod -- earthy, perhaps even a bit funky. I used to only be able to find it in Portuguese markets but now even BJ’s wholesale and my local grocery store carry it. Look for ones without bones (sin espinas) or skin, it’s worth the extra money. We get the Piquillo peppers from our Harris Teeter grocery store: they’re in a can and, surprisingly, are the store brand. The can holds about 20 peppers which is just right for this recipe. For the sauce, the original recipe calls for Choricero chili peppers but these are very difficult to find, I’ve only had them from tienda.com. I use a flavorful fruity but mild Mexican chili like ancho, pasilla or poblano -- good rich taste and readily available.
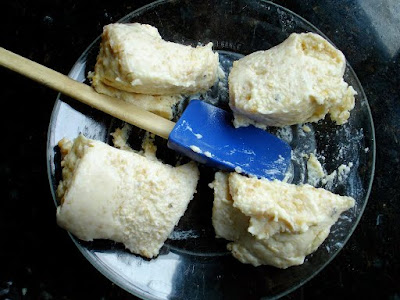
Dividing the bacalao bechamel for stuffing
Dividing the dough for spooning
Stuffing the pequillo with firm bechamel
Spooning in dough; a pastry bag is much easier
 
IMG_2139.JPG
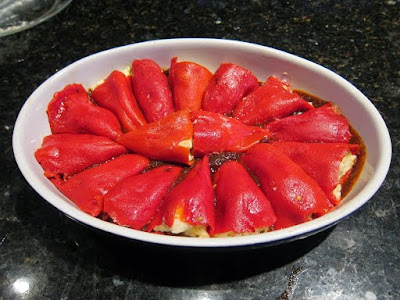
Stuffed peppers arranged on a layer of sauce
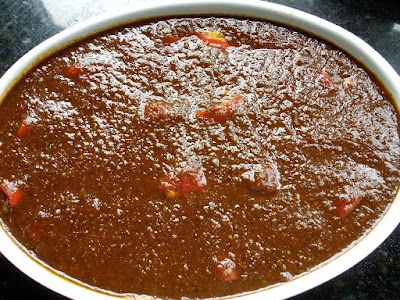
The assembled, sauced dish ready for baking
Cover with sauce then bake

Bacalao-stuffed Pequillos


225 g 1/2 pound Bacalao (boned and skinned dried salt cod)
50 ml 3 Tbs Olive Oil
25 g 3 Tbs Flour
350 ml 1.5 Cup Milk, heated
20 Piquillo Peppers (approx, from 1 can)

Rehydrate the Bacalao 1-2 days, changing the water several times a day. It will never be as soft as fresh but it should be flexible rather than firm; consider saving some of the last soaking water to loosen the sauce.
Whiz it in a food processor until roughly the texture of cooked ground beef, not a mush.
In a non-stick pan, saute Bacalao in Oil until lightly browned,
add Flour and cook another 15-20 minutes.
Slowly add the heated Milk while stirring and cook until resulting bechamel is smooth and thickens.
Cool so it firms up: it’s easier to fill the Piquillos if it’s almost a dough than a gravy.
It's easiest to stuff these with a Pastry Bag: fill the bag, then squirt into each pequillo "sock";
if you don't have that, it helps to divide the dough into 4 lumps, then divide each lump between 1/4th of the peppers -- that way each is filled evenly and you won't run out; fill each pepper by spooning in filling.

Basque Sauce


While the bechamel is cooling, make the sauce. I’ve cut back on the oil a fair amount from the original recipe as I found it too oily; this still has plenty of richness.

45 g 1.25 oz Dried Choricero, Poblano, Ancho Chili (rich, not spicy)
2 medium Yellow Onion, quartered
1 medium Red Onion, quartered
80 ml 1/3 C Olive Oil
1 clove Garlic
2 T Serrano Ham or Prosciutto (I usually omit)
1 Plum Tomato
to taste Salt

Slit Chilis and shake out seeds.
Rehydrate Chilis in cold water at least 8 hours; drain, reserving 1 Cup liquid.
Scrape out remaining seeds gently so you don’t lose the flesh.
Whiz Onions in food processor until a chopped fine, maybe ¼ inch chunks.
Saute Onions in Oil until softened.
Whiz the Chilis, Garlic, Ham, Tomato and cooked Onions in a food processor until smooth.
Add back to pan and cook about 20-30 minutes until everything’s soft and sauce reduced a bit, perhaps not as thick as ketchup; add reserved hydrating Liquid if it gets too tight or you want to boost the flavor.

Assembly


Spoon a little of the sauce on the bottom of a casserole or baking dish.
Arrange stuffed Pequillos in the dish; handle them gently so the sauce doesn’t ooze out too much.
Remember the arrangement so it’s easier to remove them gracefully at service.
Add the rest of the sauce, it should cover the Pequillos.
Bake at 350F about 30 minutes until hot and bubbly and a bit browned on the top.
Let cool a bit and firm up before serving.


2015-05-21

No Knead, Long Fermented Bread


Mark Bittman popularized the technique Steve Lahey created for “no knead” bread. I was skeptical: my first attempt left hunks of raw flour, and it’s not that hard for me to let a KitchenAid knead my bread for 10 minutes. But I tried again later, ensuring I had enough water for the high-hydration Lahey says is needed, and it worked well. In fact, I find it works better than kneaded bread I usually make: the crumb has a more golden yellow color than dough that’s oxidized due to kneading, I think it has more flavor, and it rises as well as any of my others.
The theory is that gluten development doesn’t really require physical kneading -- it will develop by itself given time and enough hydration (water to flour ratio). So while conventionally made breads may be 65% hydration, this is around 80%. It makes it easy to mix, but tricky to form for beginners.
I’ve combined the no knead approach with my usual long slow fermentation.  I use little yeast and an extended fermentation (rise) time, slowing it down as much as possible to increase flavor by fermenting in the fridge. You really can taste a difference between short conventional same-day ferments and 2 or 3 days.  I ferment in 2 Liter Rubbermaid tubs and cheat a bit on the lift, stretch, fold, flip that Lahey does.

As with my yes-knead bread, I make batard (fatter than baguette) and boule (round) shapes with different baking techniques, discussed below.

I use the “baker's percentage” to easily scale recipes. The idea is that your amount of flour always counts for 100%, and other ingredients are relative to that. So 1000 grams flour and 800 grams water means the water is 80%, you have 80% hydration. I use metric to make measurements easy and find my KitchenAid can handle 1 Kg, which I frequently use to “mix” (not “knead”) the ingredients when I’m doing a lot of baking in a day.

1000 g Flour (I use King Arthur all purpose unbleached)
 20 g Salt (I use Kosher, not iodized table salt)
2.5 g Yeast (about 1 tsp)
800 g Water

Combine the dry ingredients well.
Add the water and use a stiff spatula or stand mixer dough hook to combine well;
try not to leave unmixed flour.
Shape into a rough ball -- it’ll be sticky -- and drop into a 2 Liter plastic tub or mixing bowl;
Cover and rise in the fridge for 2-3 days.
It should rise to the top, creating 2 Liters of dough.

The day you bake, take the dough out about 5 hours before you plan to bake.
Redistribute the dough by pulling it up from the bottom and folding over the top; I use a stiff spatula to pull up around the edges then try to roll it over.
Let it rise covered until it again doubles in size, or nearly so, and warms up, maybe 4 hours depending on your kitchen’s temperature.

A double batch gives 4 large, forearm-sized batards

If you’re making batards, cut the dough in half, then for each, roll it out flat by hand,

fold over like a letter, then turn perpendicular and roll it up like a jelly roll tightly.
You want to stretch the outer surface over the core.
Seal the seam with your fingertips and place into cloth-lined wicker baskets or just cloth on the counter with cloth separating each batard roll.
Let them rise until when you press with a finger it doesn’t immediately fill back in (under-risen), but don’t wait so long that it struggles to fill back in (over-risen).
Before it’s finished rising, preheat your oven as high as it will go -- I do 550F plus convection.
If you have a baking stone (cheap quarry tiles work too) preheat it too;
if not, you can just use a cookie sheet.
When the dough’s risen and the oven and stone are bitchin’,
carefully roll the dough out of their baskets or cloth onto the stone or sheet.
Slash the top with a razor or sharp knife, and close the oven door.
Bake for about 30 minutes until the outside is deeply golden, I prefer a dark brown myself as it gives a nutty taste.
Remove to cooling racks to provide ventilation and let cool before cutting;
listen for the cracking sound as it cools :-)


If you’re making boules, you can get a great result by baking in a “cloche”, a hot covered container: it keeps the humidity up so the bread can rise before the crust hardens. I use a large Le Creuset casserole, a Rumertopf clay pot (soaked in water before hand), or a Tagine. If you don’t have one, you can do it free-form on a cookie sheet.


At a friend's house, I didn't have a scale nor stand mixer, so I did a half-sized batch for a boule, and used a food processor to knead the dough about 30 seconds, and used a Tagine as a cloche, and baked at 450F for 30 then 20 minutes:


4 C AP Flour
2 tsp Kosher Salt
1 tsp Yeast
1 3/4 C Cold Water

A small-batch boule done in a friend's kitchen between cocktails: total active time was 15 minutes

Shape the entire dough into a ball and stretch the top outside down and over the sides towards the bottom, creating a taut surface; pinch the bottom closed.
Let rise on parchment covered lightly with a floured cloth.
Rise until a finger-poke doesn’t spring back but not so long it remains a void.
Preheat the pot and lid in a 500F oven while the boule finishes rising.
Carefully remove the pot out of the oven, remove the lid and and gently drop the loaf in the pot by holding the edges of the parchment.
Put on the lid and return to the oven for 30 minutes.
Remove the lid, turn down the heat to 450F and finish baking for 15-30 minutes
until the center’s fully cooked through and the color is deep golden.
Remove bread and cool on racks to allow ventilation, listening to the cracking sound, before cutting.

I get the most control using the oven in my kitchen, but usually throw a few loaves into our outdoor pizza oven after everyone's finished making pizzas. Let it cool down from pizza-friendly 900F to bread-friendly 450F-500F, else you'll incinerate your bread (been there, done that). I put a little door in the opening to keep the heat inside and even, and rotate the bread part way through the baking process. It's a great way of getting the more use of the heat of the oven.


2015-05-20

Thai Herbal Sausage from Pok Pok Cookbook

Northern Style Herbal Sausage
Sai Ua Samun Phrai
From Pok Pok Cookbook


We've made this a few times and really enjoy it. It's redolent of galangal, turmeric, lemon grass, and cilantro -- very appealing. The flecks of color under the skin give it visual appeal.

I first made this "by the book", including all the pounding (pok pok) with a mortar and pestle. As he says, it "is a royal pain". I'm now using a food processor, putting in the most woody items first (galangal, turmeric) then adding the others from most dense to most fragile; it turns out quite well. I've recently started using frozen chopped lemon grass instead of peeling my own, and find it quite acceptable; it's available in the Korean and Chinese supermarkets near me. I'm also dry-frying the aromatics rather than trying to grill over open flame, which I found fidgety.

The process of grinding and stuffing the sausage is standard, I tend to mix in the paste and aromatics with the meat as it goes through the grinder so I don't have to mush them into the ground meat afterwards. Our KitchenAid mixer's grinder attachment doesn't have the 1/2-inch holes the book requests, so we used the largest we had, and the resulting texture's fine.

Paste

60 g unpeeled Garlic
45 g unpeeled Asian Shallots (I used regular shallots)
30 g Galangal, cut across grain into 0.5 cm slices
15 g Turmeric, cut across grain into 0.5 cm slices
15 g stemmed dried Mexican Puya Chiles, slit open and seeded
40 g thinly sliced lemon grass, tender parts only (or same weight frozen chopped)
18 g Cilantro roots (I used the stems)
2 g finely grated zest of Kafir Lime (I zested a regular Persian Lime)

Sausage

500 g boneless Pork Shoulder, cut into 4 cm chunks
500 g skinless Pork Belly, cut into 4 cm chunks
25 g coarsely chopped Cilantro (leaves and stems)
1/4 cup Thai Fish Sauce
4 g very thinly sliced fresh or frozen Kaffir Lime Leaves (thick stems removed)
1.5 g mild Indian Curry Powder
2 g ground Black Pepper
2 m natural Sausage Casing, about 2.5 cm diameter, defrosted, washed well

Make the Paste

Dry-fry the Garlic, Shallots, Galangal and Turmeric, turning until Galangal and Turmeric are cooked through and look dry on both sides (don't let them char), about 5 minutes, and until the Garlic and Shallots' skin is charred in spots and they are fully soft but retain their shape, 15-20 minutes. Transfer to a plate to cool.

Grind the Chilis in a spice grinder.  In a food processor, process ingredients, starting with the most woody to the most delicate: Galangal, Turmeric, then add Lemon Grass, Garlic, Shallots, Cilantro, then Chili powder and Lime Zest. Process until it's a paste, but it will be a little fibrous and shaggy.  You should have a bit more than 1/2 cup.

Make the Sausage

Rinse casings well.

Chill the meats in the freezer for 30 minutes or so until it's firm so it'll grind cleanly rather then smearing. Grind the meats with a 1/2-inch plate or your largest one, alternating Shoulder with fatty Belly. I push in the paste and aromatics (Cilantro, Kaffir Lime Leaves, Curry Powder, Pepper) as I feed the meat, but you could combine once the meat's ground. Add the Fish Sauce and any remaining aromatics to the ground mixture and combine gently to mix without smearing.

Chill the meat mixture again while you load the casing onto the sausage grinder stuffer horn. Stuff the casings, letting the filled sausage curl into an attractive spiral.  Poke holes in the casing every few inches or where there are air bubbles. Let sausage sit in fridge a few hours or over night. We freeze it in vacuum bags at this point so we can cook it whenever we like.

Defrost the sausage and steam 6-10 minutes or sous vide at 60C/140F for 20 minutes until firm and springy but not fully cooked. Grill over charcoal, carefully turning over once, until cooked through, with light brown and dark brown patches. Let it cool to room temperature for serving.